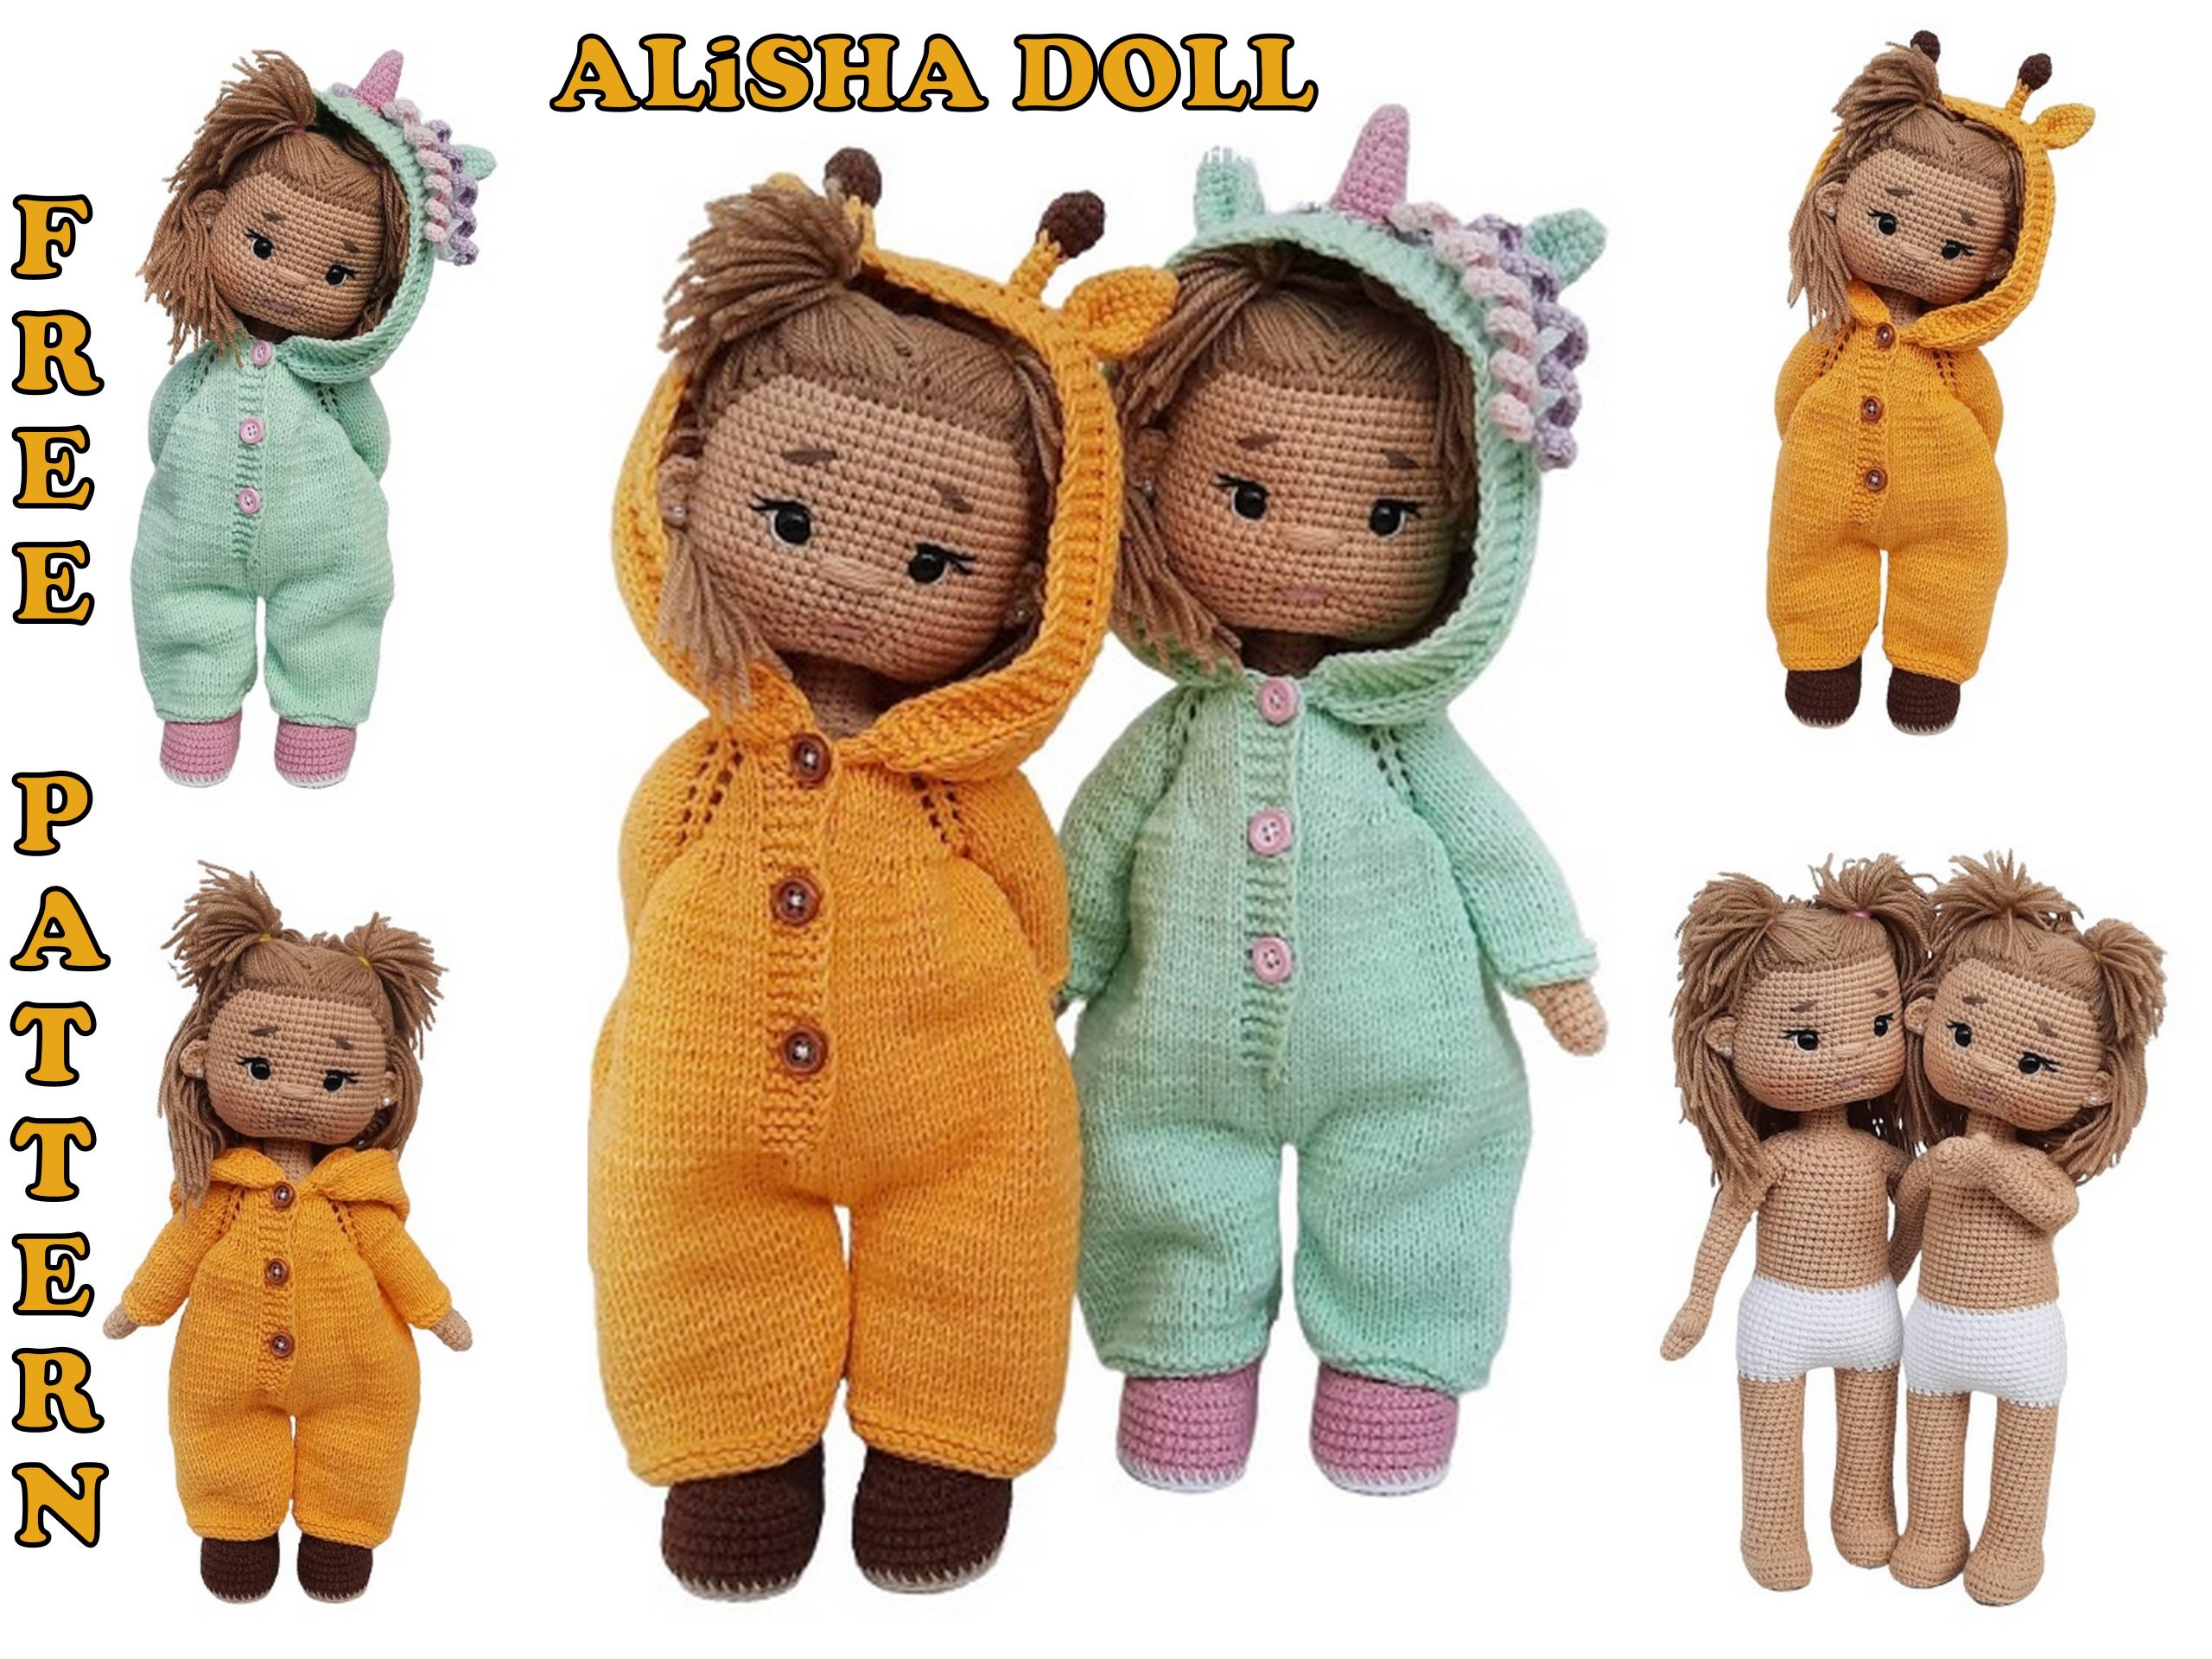
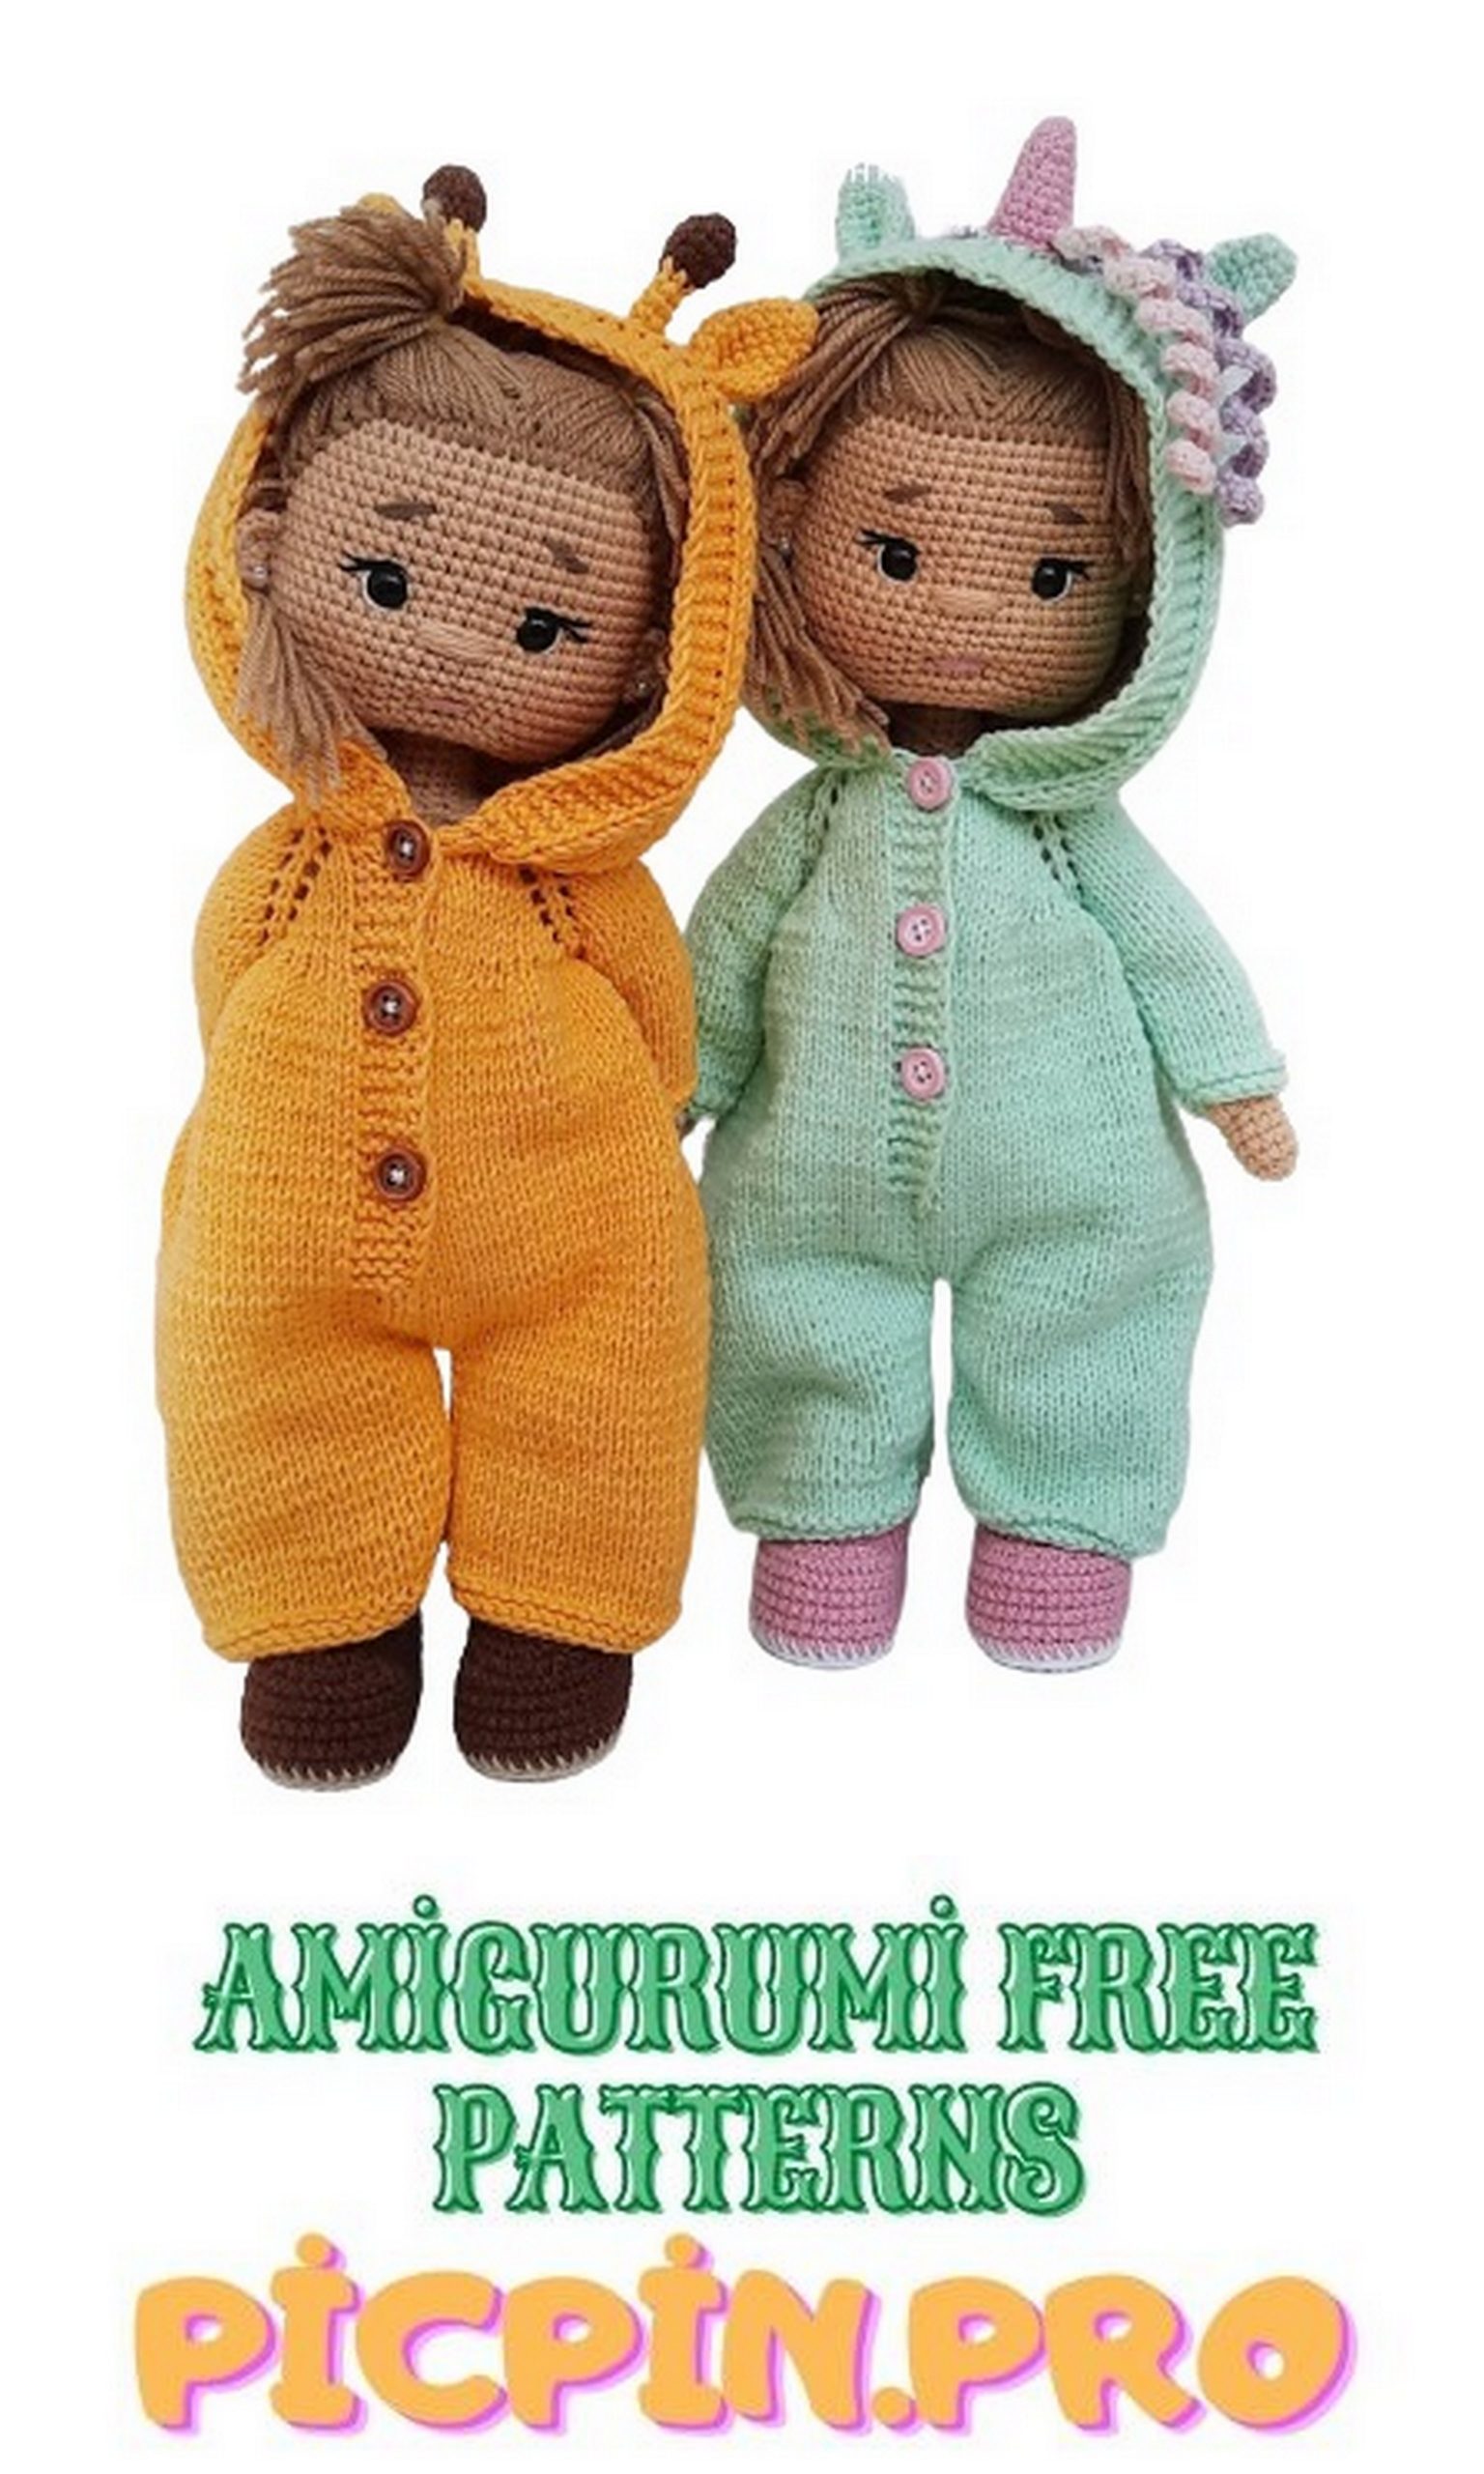
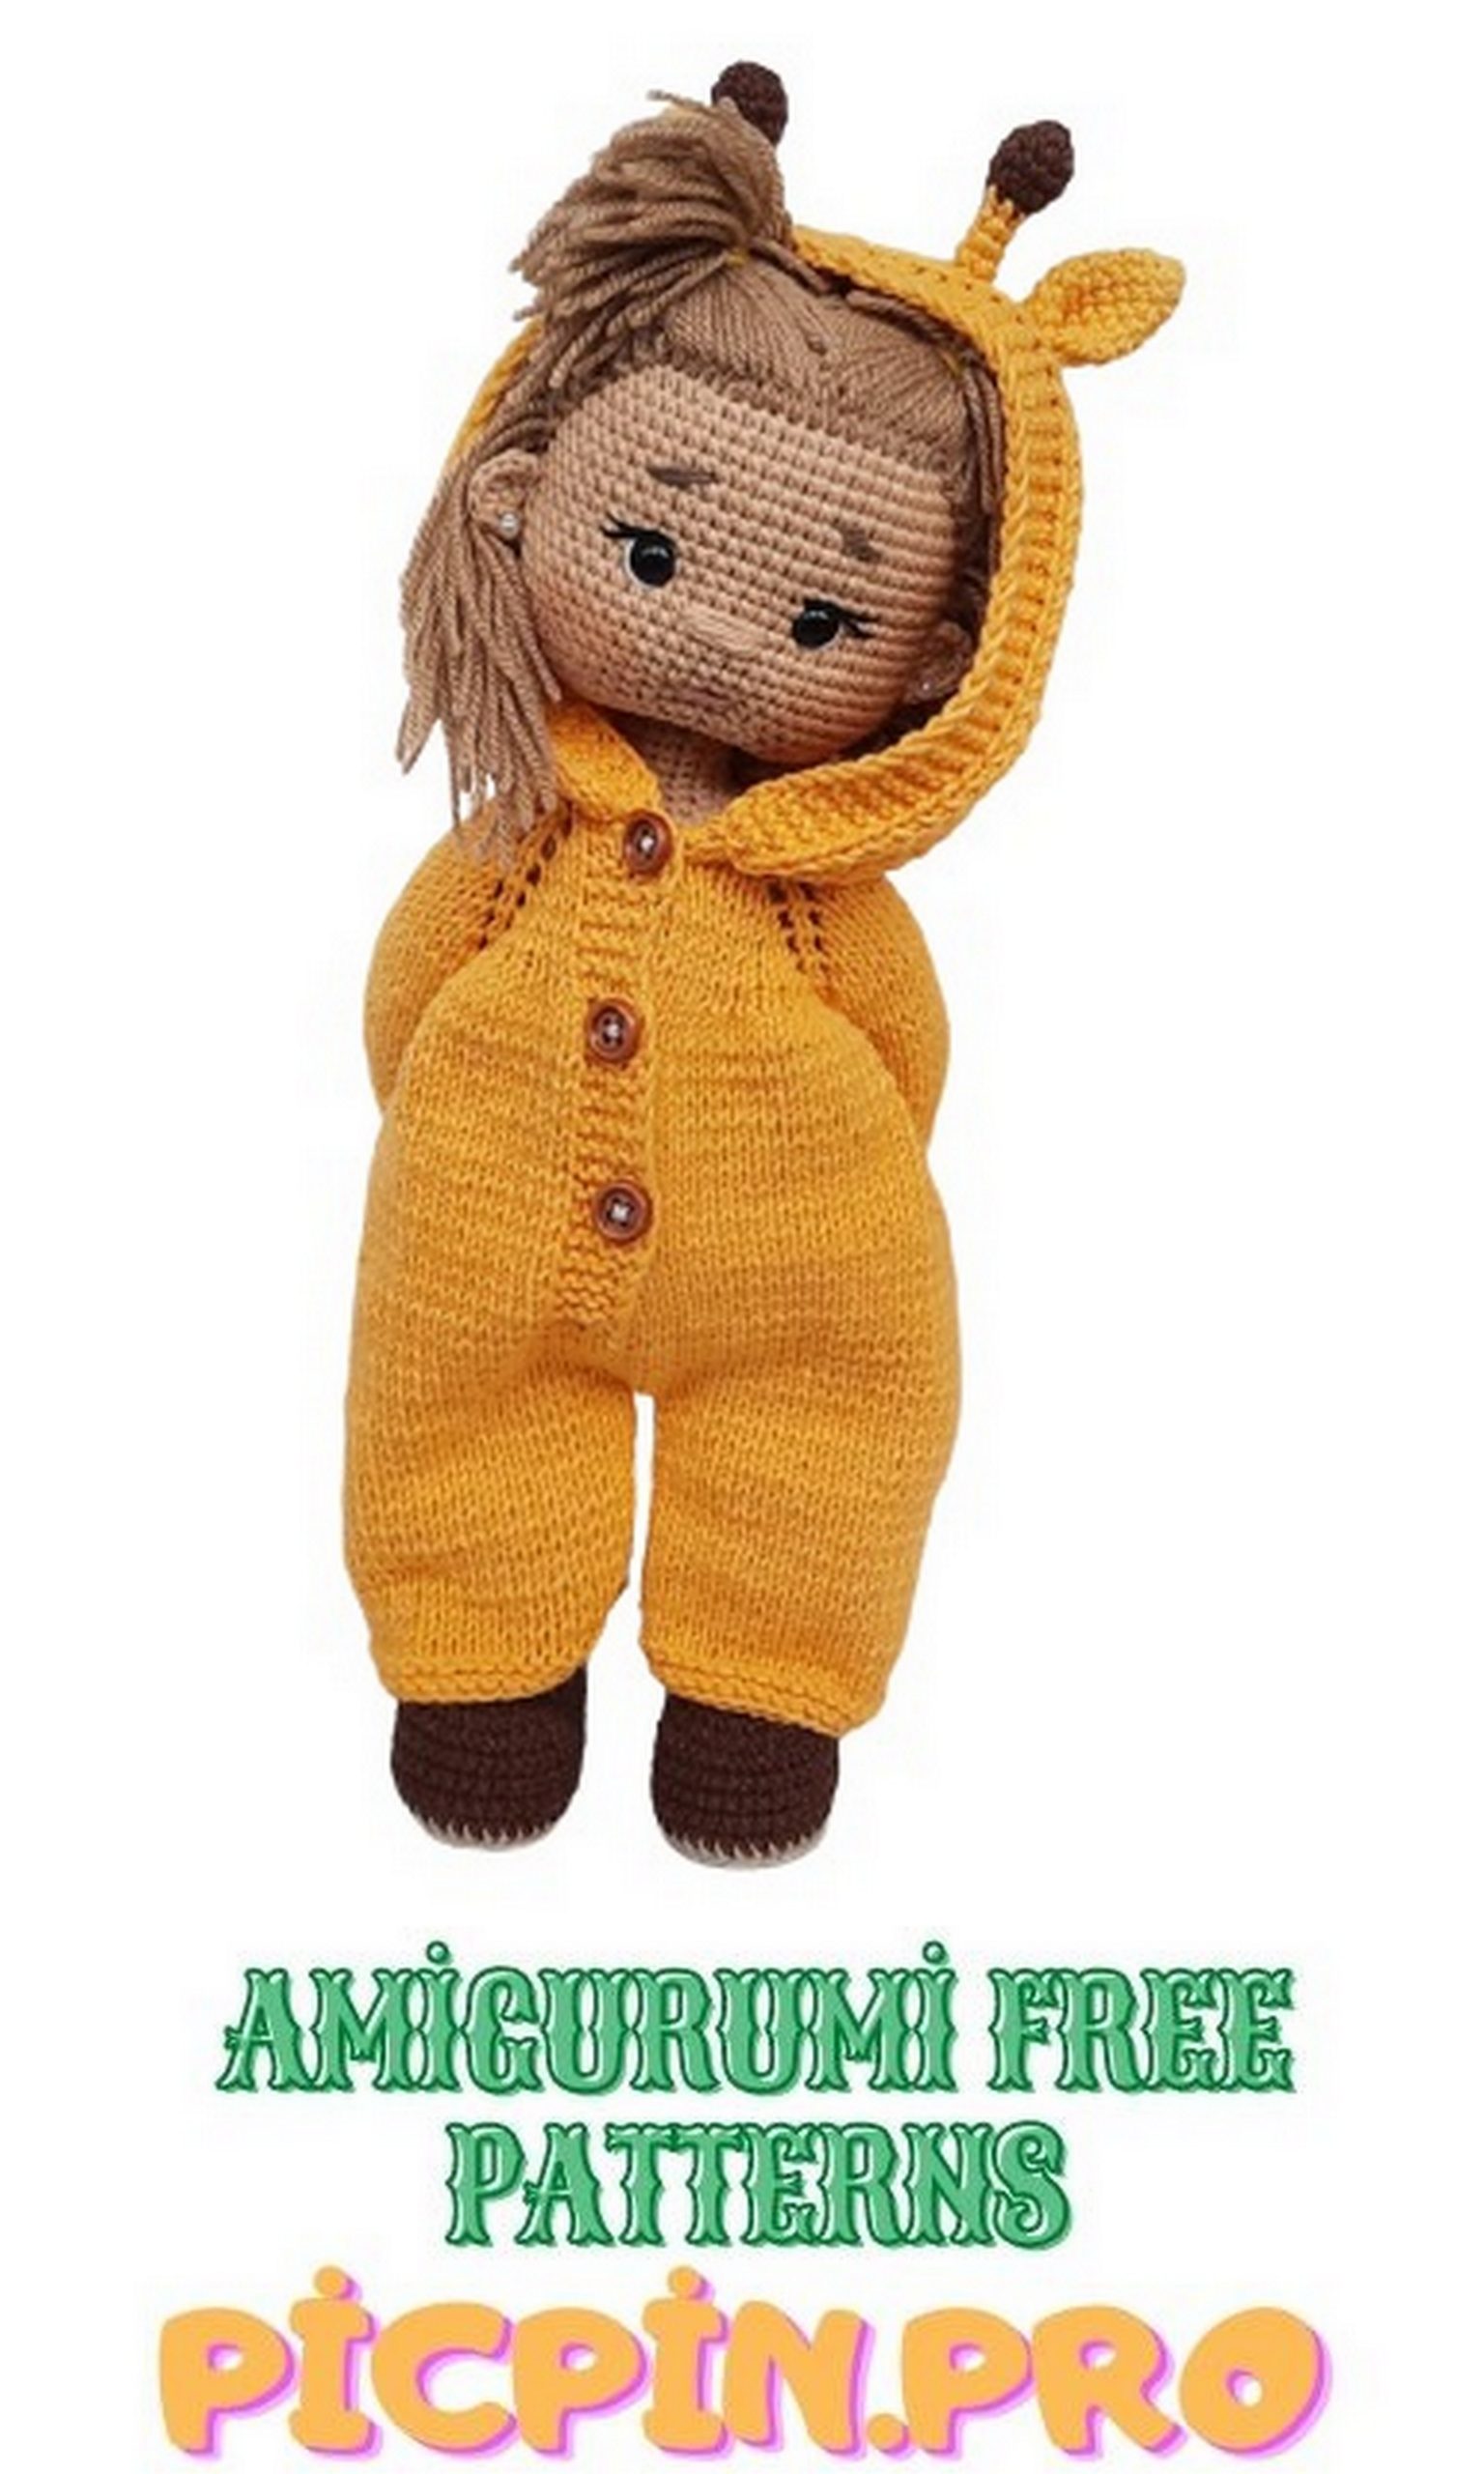
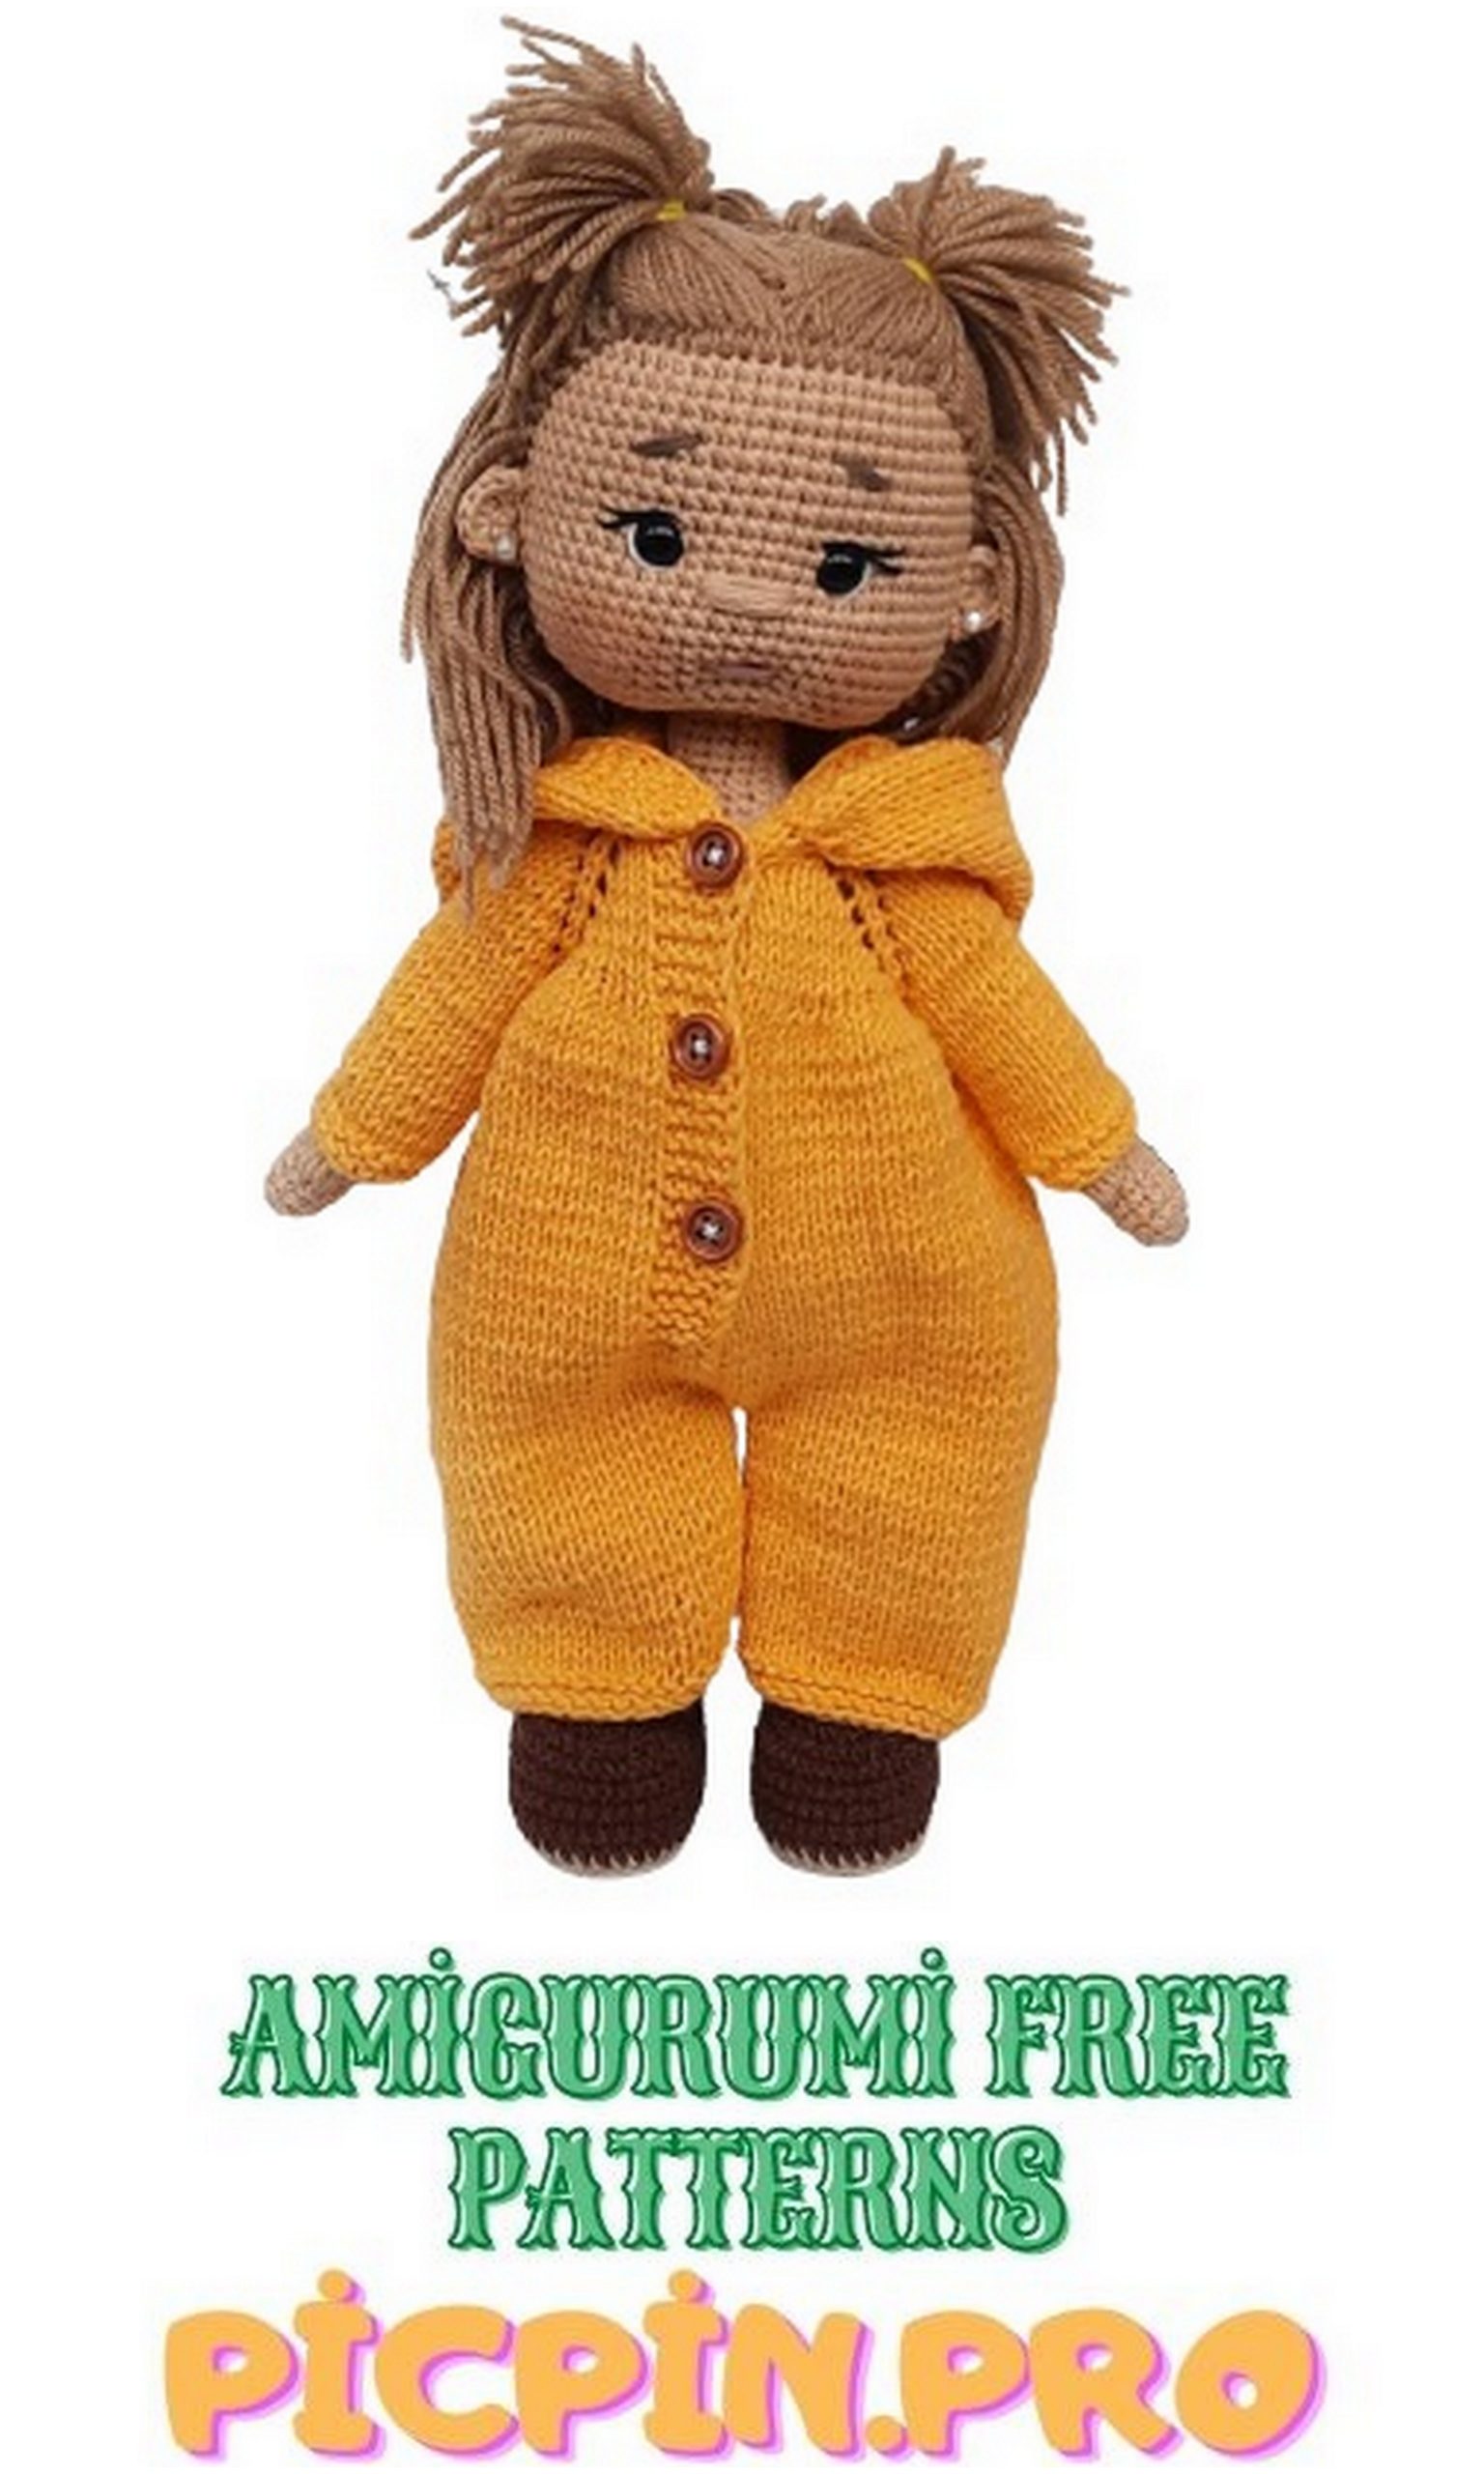
Alisha Doll Amigurumi Free Pattern
Pinterest Offical Page : Picpin.pro
Facebook Group: Amigurumi Free Patterns
Facebook Offical Page: Free Amigurumi Picpin
Wonderful amigurumi doll patterns are with you for free. You will love this very cute amigurumi doll pattern.
NECESSARY MATERIALS:
1. Hook 1.90 mm
2. A skein of yarn YarnArt Jeans beige for the body (number 07)
3. Some white YarnArt Jeans yarn for panties (number 62)
4. Yarn Pekhorka “Children’s novelty” for hair (for light – color number 165, for dark – color number 187. Consumption is less than a hank)
5. Eyes 9-10 mm on a secure mount
6. Two wires of 19 cm for a frame with a diameter of 2 mm
7. Thin medical plaster
8. A sheet of thick cardboard to cut your hair
9. Blush for cheeks
10. Hair ties
11. Filler holofiber
12. Plastic cover for foot insoles
13. Scissors
14. Big needle
15. A bit of black, white, brown threads for face decoration
MATERIALS FOR CLOTHING AND SHOES:
1. Slightly more skein of YarnArt Jeans yarn for overalls (for giraffe color number 35, for unicorn color number 79)
2. A little YarnArt Jeans yarn for shoes (for a giraffe color number 70, for a unicorn color number 20. The color of the sole can be any)
3. Stocking needles 2 mm
4. Three buttons
5. Cardboard for shoe insoles
6. Additional colors of YarnArt Jeans yarn for design of overalls
When using these materials, the height of the doll is 30 cm
Abbrevations:
ch – chain
sc – single crochet
inc – increase (2 sc in one loop)
dec – decrease (2 sc together)
dc – column with one crochet
sl-st – slip stitch
All parts are knitted in a spiral, unless otherwise indicated.
Handles (2 parts):
We fill the handles at the very end, when the whole body is connected. This point is described below.
1.6sc into magic ring
2.6inc (12)
3-6. 12sc (4 rows)
7.5dc with a common top in one loop (hook makes 6 loops), 11sc (12)
8-9. 12sc (2 rows)
10. (2sc, dec) * 3 (9)
11. (2sc, inc) * 3 (12)
12-28. 12sc (17 rows)
Cut the thread and hide it inside. Knit the second handle in the same way, at the end additionally knit 9sc to finish knitting on the inside of the hand (fingers look forward).
Legs (2 parts):
1.10ch
2. Starting from the second loop from the hook, knit 8sc, 4sc into the last loop, 7sc along the second side of the chain, inc (21)
3.inc, 7sc, 4inc, 7sc, 2inc (28)
4.1sc, inc, 7sc, (1sc, inc) * 4, 7sc, (1sc, inc) * 2 (35)
Transfer the outline of the resulting part to the plastic cover.
Cut out the insole (2 parts).
5.35sc for the back walls of the hinges
6.35sc
7.10sc, 7dec, 11sc (28)
8.9sc, 4dec, 11sc (24)
Insert the insole into the foot.
9. (2sc, dec) * 6 (18)
10-32. 18sc (23 rows)
Legs need to be filled in the course of knitting approximately to the middle. I do not fill the toe of the foot very tightly, but the heel and the leg itself are quite tight.
Knit an extra sc to complete the knit on the inside of the leg. On the first leg, I knitted an additional 8sc, on the second I did NOT knit 2sc in the last row (you may get a different number of stitches due to the difference in knitting density).
Cut the thread on the first leg and hide it, on the second in the last column, change the thread to white, make 3ch, connect the legs and continue knitting.
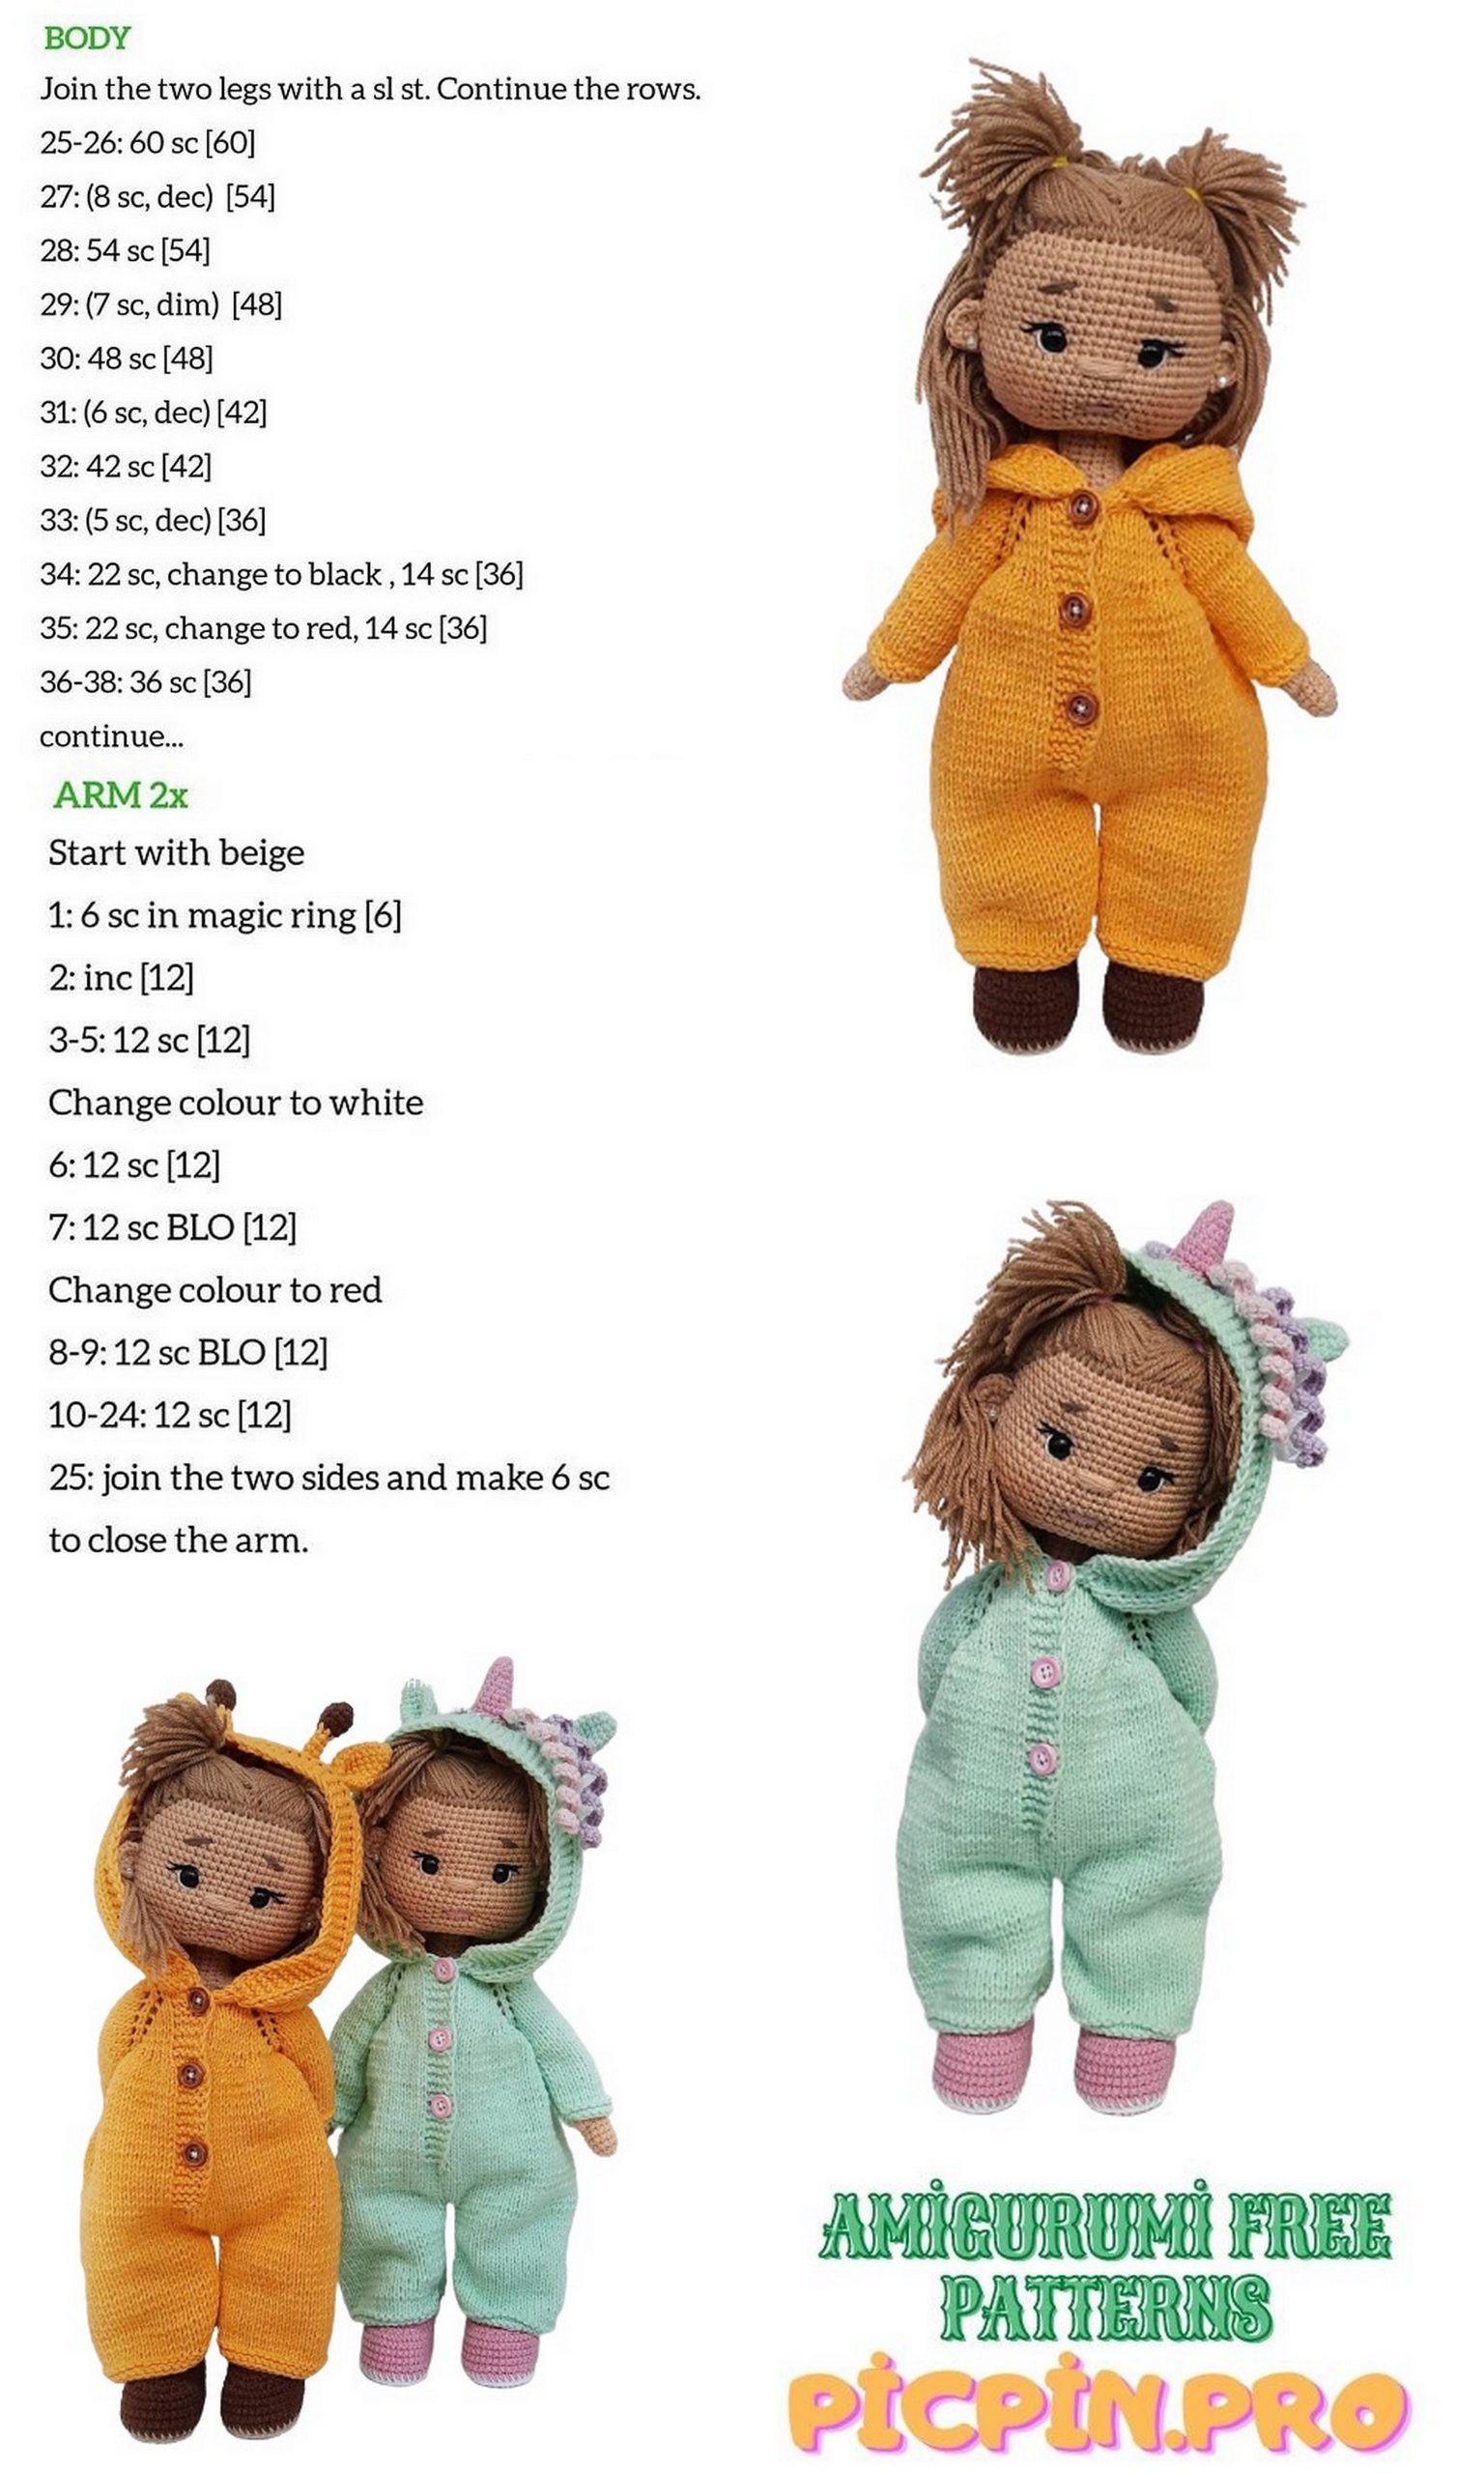
Body:
1.18sc along the first leg, make sl-st into the already knitted column, so that later there are no holes between the legs, 3sc along the chain of ch, sl-st into the already knitted column, 18sc along the second leg, 3sc along the second side of the chain (42 )
In the next row, sl-st does not need to be knitted!
2.3sc, inc, (6sc, inc) * 5, 3sc (48)
3. (7sc, inc) * 6 (54)
4-11. 54sc (8 rows)
12. (7sc, dec) * 6 (48)
13.3sc, dec, (6sc, dec) * 5, 3sc (42)
Knit an additional 10sc and change to beige. So the color transition will not be conspicuous.
Please note that I start filling the legs from the middle and the body when the doll’s panties run out. It is also very important to evenly and tightly fill the transition from the legs to the body so that the doll does not bend in this place and can stand confidently.
14-24. 42sc (11 rows)
25. (5sc, dec) * 6 (36)
26.36sc
Remove the marker and knit additional stitches to the middle of the back.
Next, you need to knit the handles and form the shoulders.
On the sides of the body, it is necessary to select 5 medium loops.
Leave 13sc between the handles.
Attach the handle with your finger facing forward.
Then knit according to the scheme:
27.7sc on the back, 5sc grabbing the loops of the arm (inside) and body, 13sc on the chest, 5sc grabbing the loops of the second hand (inside) and the body, 6sc on the back. Place a marker in the next loop. This will be the beginning of a new series (36)
28.7sc on the back, 1sc to where we connected the first handle to the body, i.e. into the already knitted column, then 8sc along the outside of the handle (the eighth column is obtained when the handle is connected to the body in the previous row. I knit into this column, otherwise there will be holes in the shoulders), 13sc along the chest, 1sc to where we connected the second handle with the body, then 8sc on the outside of the arm, 6sc on the back (44)
Fill your body tightly enough.
29. (dec, 20sc) * 2 (42)
30. (5sc, dec) * 6 (36)
31.2sc, dec, (4sc, dec) * 5, 2sc (30)
Take two 19 cm wires and tape the ends on one side with tape. Put the resulting frame in the handles.
Shape the shoulders and twist the wires together.
Now you need to fill the pens. I use scissors to push the filler all the way to my palms. It is not necessary to overfill the handles.
32. (3sc, dec) * 6 (24)
33. (2sc, dec) * 6 (18)
34. (4sc, dec) * 3 (15)
Fill the shoulders evenly and shape them nicely.
35-40. 15sc (6 rows)
Cut the thread and hide.
Insulate the ends of the wires with a plaster.

Head:
1.6sc into magic ring
2.6inc (12)
3. (1sc, inc) * 6 (18)
4. (2sc, inc) * 6 (24)
5. (3sc, inc) * 6 (30)
6.2sc, inc, (4sc, inc) * 5, 2sc (36)
7. (5sc, inc) * 6 (42)
8.3sc, inc, (6sc, inc) * 5, 3sc (48)
9. (7sc, inc) * 6 (54)
10.4sc, inc, (8sc, inc) * 5, 4sc (60)
11-27. 60sc (17 rows)
Insert safety eyes between rows 19 and 20 of the head. 10sc peephole between the legs. There are 8 visible columns.
28.4sc, dec, (8sc, dec) * 5, 4sc (54)
29. (7sc, dec) * 6 (48)
30.3sc, dec, (6sc, dec) * 5, 3sc (42)
31. (5sc, dec) * 6 (36)
Start filling your head.
Fill the top of the head tightly, but leave the bottom of the head flat. Do not stretch your head into an oval.
32.2sc, dec, (4sc, dec) * 5, 2sc (30)
33. (3sc, dec) * 6 (24)
34. (2sc, dec) * 6 (18)
35. (4sc, dec) * 3 (15)
Leave the thread for sewing.
Face shaping and shaping:
First tightening:
Take a needle with beige thread.
Find the approximate midpoint between the eyes and insert the needle into the middle column between the 33rd and 34th rows of the head.
Withdraw the needle near the middle of the first eye. Insert the needle on the other side of the eye and withdraw it at the bottom of the head, two columns to the left from the starting point.
Step two columns to the right from the starting point and insert the needle.
Bring it out near the outer middle of the second eye. Insert the thread on the other side of the eye and bring it out to the starting point.
Please note that the thread should lie under the eyes. Tighten by pulling on the threads. Tie a couple of knots. Hide the ends inside the head. The first tightening is ready.
Second tightening:
Let’s make the eyes a little closer to each other
Insert the needle between the 33rd and 34th rows of the head, near the original point of the last tightening. Bring it out near the inner side of the first eye from below.
Insert the needle near the same eye from above and bring it out near the second eye from the inside from the bottom (try to insert the needle as close to the eyes as possible so that the threads will then hide under them). Guide the needle near the same eye at the top and bring it out at the bottom of the head, stepping back one column from the end of the thread.
Tighten by pulling on the threads. Tie a couple of knots, hide the ends inside the head. The second tightening is ready.
Gently add a little of the filler just to the cheeks to plump them up.
Embroider the nose, stepping down one row from the eyelet. I made 6 stitches.
Take a needle with white thread. Enter it anywhere between the columns and draw the eyes at the bottom, as shown in the photo. Insert the needle on top of the same eye and withdraw it at the bottom of the second eye.
Insert the thread from the top of the eye and bring it to the starting point. Do not pull the thread tightly so that it does not slip under the eye. Make a couple of knots, hide the ends inside the head.
Take a needle with black thread and embroider the eyelashes as shown in the photo.
We embroider the eyebrows. I used Pekhorka yarn “Children’s novelty” color 187 (cappuccino).
Mouth tightening:
Count 6 rows down from the eyelet. Place the needles between rows 6 and 7.
The width of the mouth is approximately equal to the width of the nose.
Take a beige thread needle. Enter it at the crown and bring it out near the first needle, enter it near the second needle and bring it to the crown, departing from the initial point one column. Tighten by pulling on the threads. Tie a couple of knots, hide the ends inside the head. The dimple on the crown under the hair will not be visible.
With pink thread, sew two stitches on the lips. I used YarnArt Jeans color 36.


Ears (2 parts):
1.6sc into magic ring. Do not close the ring
2. Make 2ch, twist knit, 3sl-st, 3inc from hdc
Leave the thread for sewing. Pull off the magic ring.
Tie the other ear in the same way.
Count 8sc out from the eyes and sew on the ears.
I sewed the top of the ears one row above the eyes.
Hair attachment:
Take a thick cardboard 8 cm wide. Wrap hair yarn around it and cut on one side.
Count 9 rows up from the eyes. It is in the ninth row, using knots, to tie the hair along the forehead line. The hook must be inserted from the doll’s face.
I always tie the hairs, focusing on the edges of the cilia (see photo)
Then tie your hair in the back of your head. I start tying in the 5th row of the head. Length of occipital line approximately from ear to ear. The hook must be inserted from the top of the head, i.e. top down.
Further, from the edge of the back of the head, tie the hairs in each column, rising up to the ear. From the top of the ear, start tying the hairs obliquely to the edge of the forehead line.
The contour is done, now you need to fill the entire head with hair.
Go back to the back of your head and tie your hair one row, and every two stitches in the row.
Tie the next row of hair as well, but in a checkerboard pattern in relation to the hairs from the last row.
In the same way, tie the hairs up to the very top of the head.
For the remainder, tie your hair straight away from your face so that it fits well in your hairstyle. The hook must be inserted as shown in the photo.
Hair styling:
Determine for yourself approximately a parting in the center of the head. And along this line, add hairs to each column.
We have two hairs in each column. Divide them between the doll’s tails to make the parting look thick and beautiful.
Lift up your ponytail hair and add hairs to each column for a nice parting.
Further, from the top row, from each column, I lower one hair down to make the parting look more natural.
Tie the ponytail with an elastic band. Issue the second in the same way.
Put the head on the frame and sew it on.
The doll is ready, it remains to decorate and dress it up
If desired, sew the beads to the pupa’s ears.
Make ruddy cheeks, after covering the body of the pupa with a towel. I use a regular, budget blush.
Boats:
We knit the sole (4 parts).
1.10ch
2. Starting from the second loop from the hook 8sc, 4sc to the last loop, 7sc to the second side of the chain, inc (21)
3.inc, 7sc, 4inc, 7sc, 2inc (28)
4.1sc, inc, 7sc, (1sc, inc) * 4, 7sc, (1sc, inc) * 2 (35)
5.2sc, inc, 7sc, (2sc, inc) * 4, 7sc, (2sc, inc) * 2 (42)
Transfer the outline of the resulting part to the cardboard. Cut out the insole.
You can use a plastic cover instead of cardboard, then the shoes can be washed. But I have dolls with such insoles, for some reason they don’t stand
Pull the thread on one sole, on the second in the last column, change the thread to the color of the boot.
Fold the two soles with the wrong sides inward and begin to connect them sc, gripping only the back half-loops of both parts. Remember to insert a cardboard insole.
Then knit according to the scheme:
1-5. 42sc (5 rows)
The marker should be exactly in the middle at the back. If you have it shifted, then rearrange it in the middle.
6.11sc, 10dec, 11sc (32)
7.11sc, 5dec, 11sc (27)
Try on the boots on the doll. If they fit well, then you may not need to knit the next row. If the boots are not tight, then knit the next row.
8.11sc, dec, 1sc, dec, 11sc (25)
Cut the thread, fasten and hide.
The boots are ready.
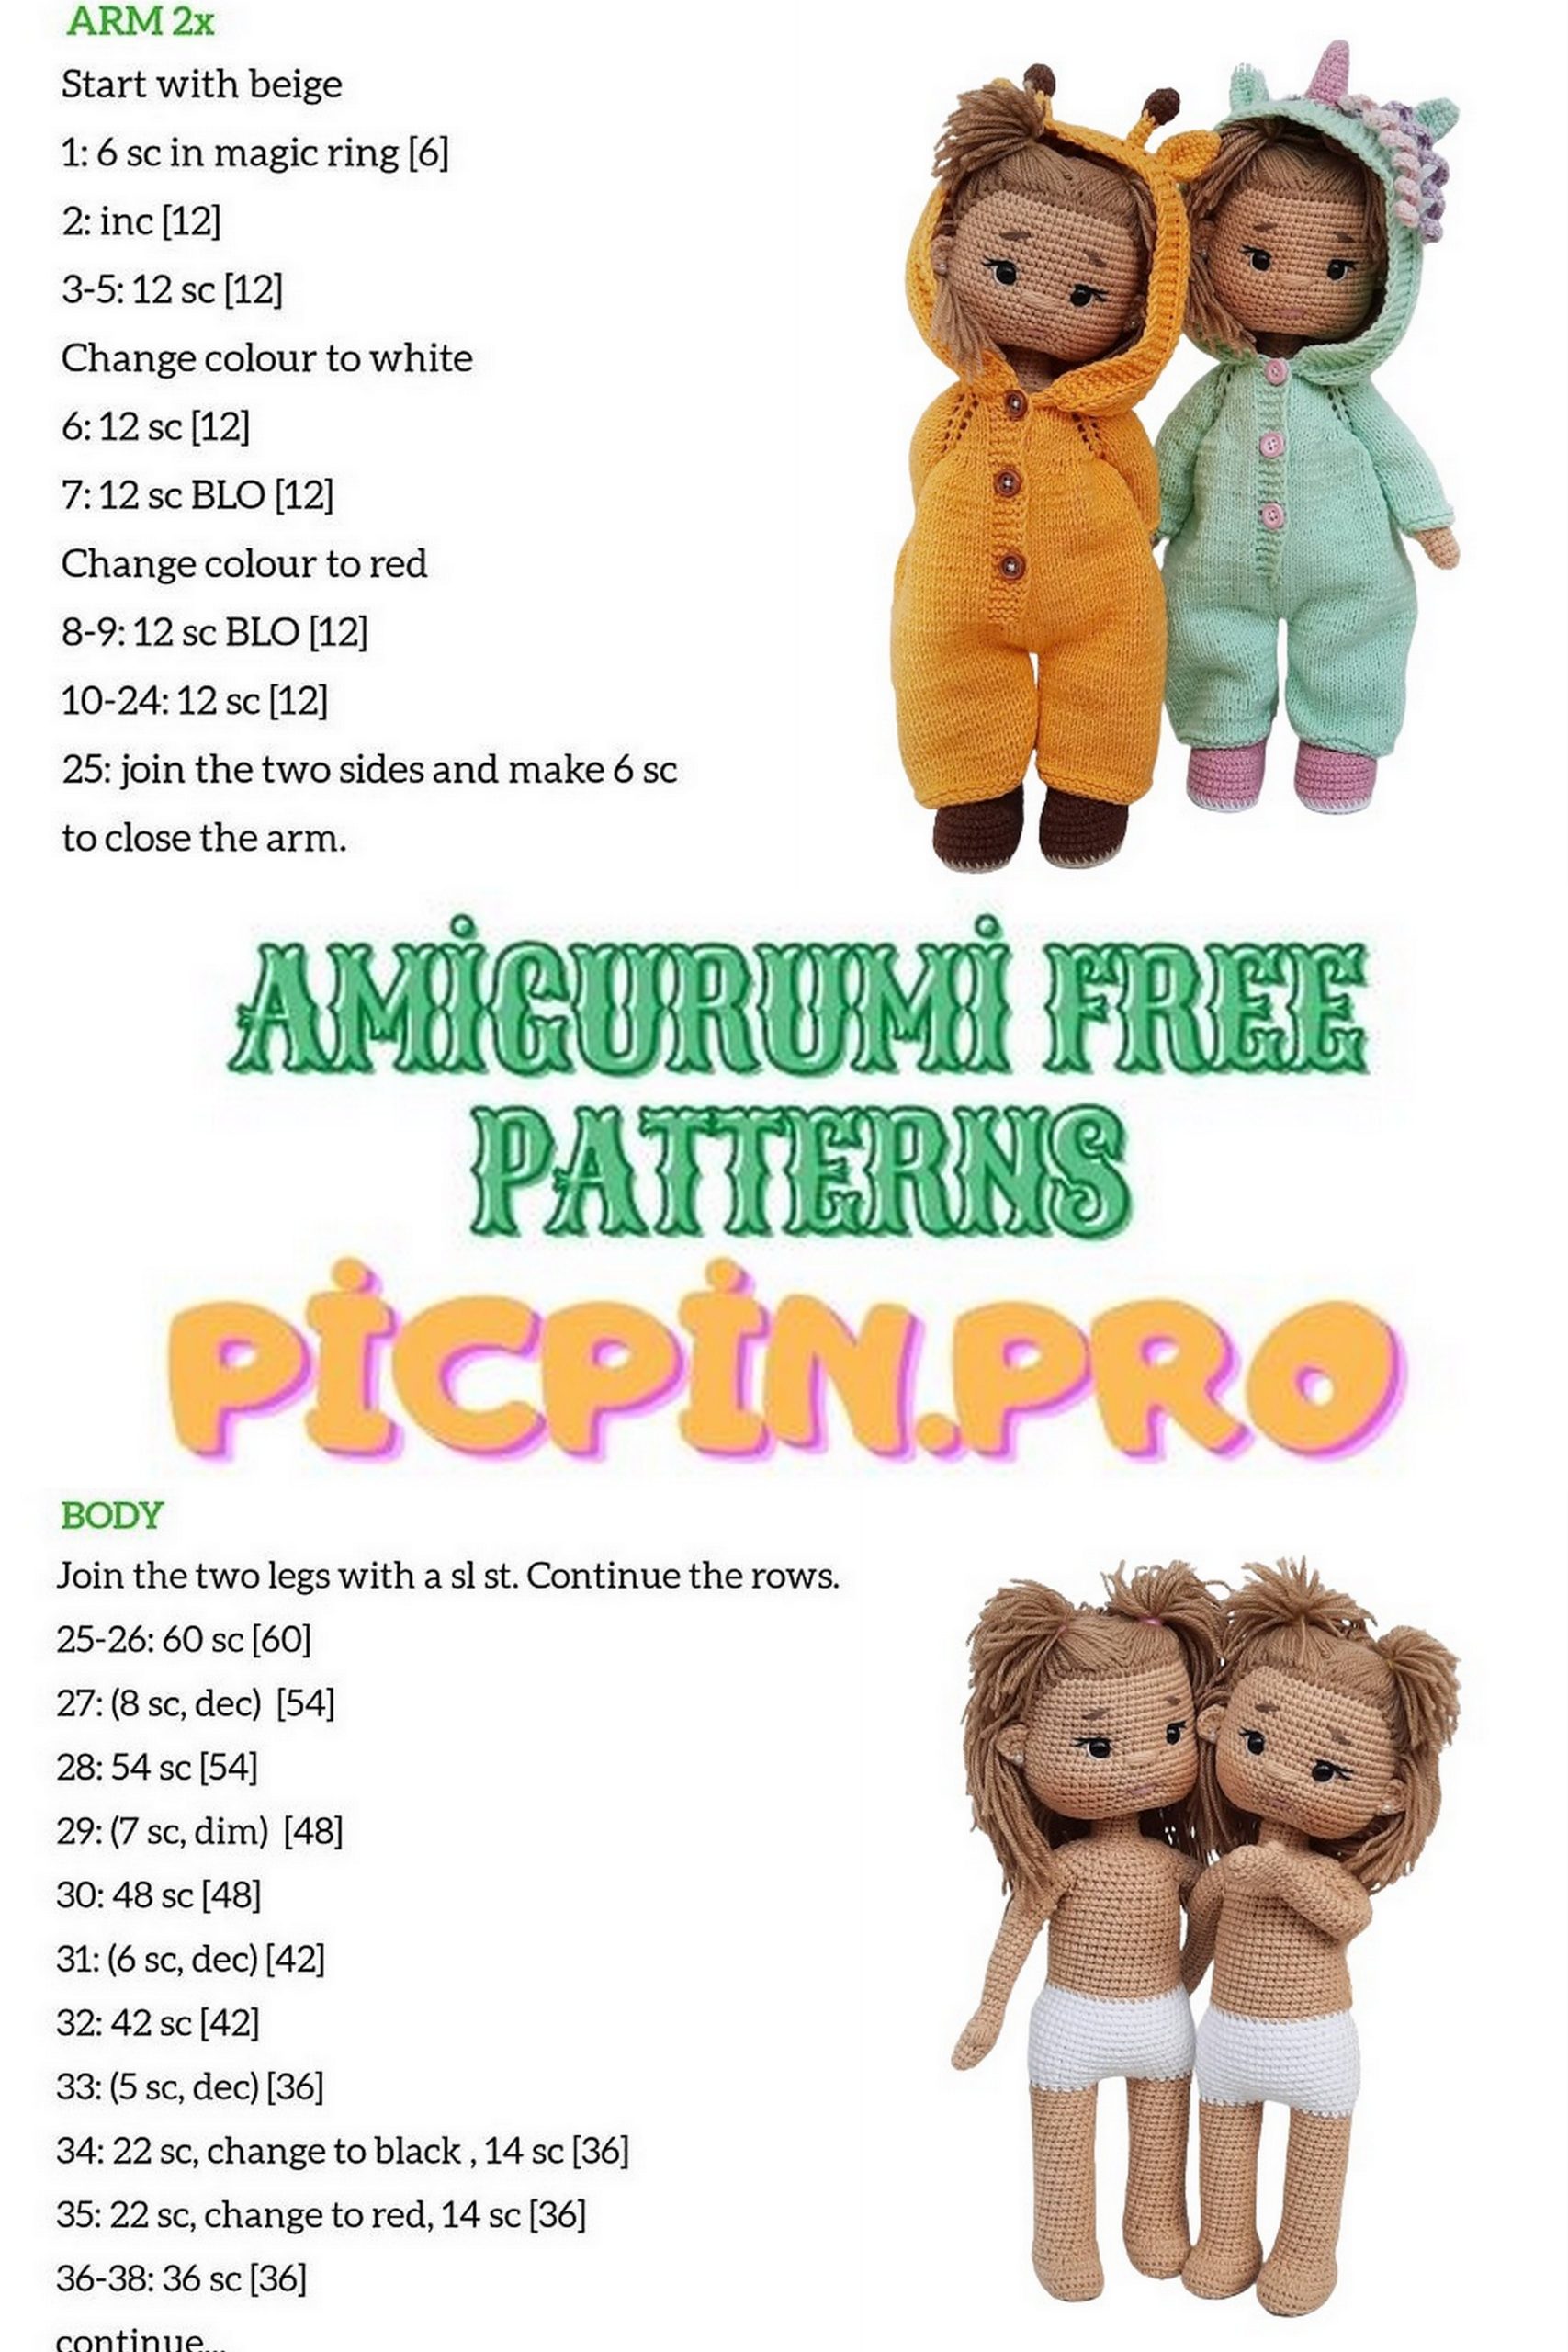

Overalls:
Abbrevations:
V – raglan (yarn, front loop, yarn)
knit – front loop
purl – purl loop
cr – edge loop
Cast on 36 loops + 2 hem stitches.
Knit the first row with purl loops.
On one side of the jumpsuit, I made a small shelf for buttons, so the number of loops after the raglan is different. On the same side, you will need to knit a strip of garter stitch.
Knit carefully according to the scheme:
1.cr, 5knit, V, 5knit, V, 10knit, V, 5knit, V, 4knit, 2knit together, yarn, 1 knit, cr (got a hole for a button)
2.cr, 4 knit, purl to the end of the row
3.cr, 6knit, V, 7knit, V, 12knit, V, 7knit, V, 8knit, cr
4.cr, 4 knit, purl to the end of the row
5.cr, 7knit, V, 9knit, V, 14knit, V, 9knit, V, 9knit, cr
6.cr, 4 knit, purl to the end of the row
7.cr, 8knit, V, 11knit, V, 16knit, V, 11knit, V, 10knit, cr
8.cr, 4 knit, purl to the end of the row
9.cr, 9knit, V, 13knit, V, 18knit, V, 13knit, V, 11knit, cr
10.cr, 4 knit, purl to the end of the row
11.cr, 10knit, V, 15knit, V, 20knit, V, 15knit, V, 12knit, cr
12.cr, 4 knit, purl to the end of the row
13.cr, 11knit, V, 17knit, V, 22knit, V, 17knit, V, 13knit, cr
14.cr, 4 knit, purl to the end of the row
In the next row, you need to set aside the loops of the sleeves, make increases and a hole for the second button.
15.cr, 6knit, 6inc, take off 21 sts on a string, 24inc, 21 sts on a string, 6inc, 5knit, 2knit together, yarn, 1knit, cr (you should have 86 stitches + 2 hem)
16-29. knit with a straight fabric, in the purl row, continue to knit 4 front loops (14 rows)
In row 29, make a third hole for the button.
30-43. continue to knit a straight fabric, in the purl row also knit 4 front loops (14 rows)
In the 44th purl row, you need to close the first two loops. To do this, without removing the edge loop, knit two loops together (I knitted with the front loop, it’s easier), return the resulting loop to the knitting needle and knit together with the next one. In total, you should get 84 loops + 2 edging. You will get a step (see photo)
Next, knit all purl loops to the end of the row. You don’t need to knit a strip of garter stitch anymore.
Knit the jumpsuit with a straight cloth to the end of the body and knit another 1cm, which will go between the legs. I have knitted 10 rows. You may end up with a different number of rows due to the difference in knitting density, so try on the jumpsuit on the doll.
Having tied the fabric to the desired length, we begin to knit the trousers. We have 43 loops on each leg, but in the first front rows you need to close 2 loops so that the jumpsuit fits nicely between the legs.
First leg:
Take an extra knitting needle.
1. Close two loops, knit 39 knit, cr and turn knitting
2.in all purl
3.cr, 39knit, cr
… etc. In total, I knitted 24 rows plus 4 rows only with front rows (garter stitch). You may need a different number of rows.
Try on the jumpsuit for the doll.
Close knitting and leave a long thread to sew.
Second leg:
Take a new thread, close two loops, knit 39knit, cr and twist the knit. Next, knit in the same way as the first leg.
Return to the sleeves and transfer the stitches from the thread to the knitting needle.
Attach a new thread and tie the sleeve. I have knitted 22 rows of front stitch plus 4 rows of garter stitch. Close knitting, leave a long thread for sewing. Tie the second sleeve in the same way.
Hood:
Hold the jumpsuit with the wrong side facing you.
Use a crochet hook to attach a new thread to the edge of the jumpsuit as shown in the photo. Transfer the resulting loop to the knitting needle.
Next, type a new loop on the knitting needle (as usual, you dial the loops at the very beginning of knitting).
Use a crochet hook to make a second loop, transfer it to the knitting needle, then cast on one new loop again, and so on. Because in the overalls, a shelf for buttons was originally made, leave the last two loops free.
In total, you should have 72 stitches on the knitting needle.
Turn knitting and knit the next row with knit stitches.
In the purl row along the edges of the fabric, make 5 knit loops (garter stitch strip). Tie a 9 cm high straight fabric. Divide the stitches in two and place a marker in the center.
Next, we begin to close the loops of the hood.
Knit the front row, when there are 3 loops left to the marker, make a decrease, i.e. knit two stitches together, then 1knit, transfer the marker to another knitting needle, again 1knit, 2 stitches together, knit to the end of the row, at the end of the hem.
Knit the purl row without changes.
Also knit the next 4 rows, i.e. make decreases through the row, only in the front rows.
Then knit as well, but make decreases already in each row, both in the front and in the purl. The principle of operation remains the same, when there are three loops left to the marker, make a decrease, then a loop, a marker transfer, a loop, a decrease and unchanged to the end of the row.
Work in rows with decrements until there are only 14 stitches left on the knitting needle.
Divide the remaining 14 stitches into two knitting needles and close the stitch to stitch with a needle.
Sew the pants and sleeves of the jumpsuit. On the front, the jumpsuit must be sewn to the shelf. The shelf needs to be sewn with a little overlap. Sew on the buttons.
Unicorn Horn:
1.6sc into magic ring
2.6sc
3. (1sc, inc) * 3 (9)
4-5. 9sc (2 rows)
6. (2sc, inc) * 3 (12)
7-8. 12sc (2 rows)
9. (3sc, inc) * 3 (15)
Work another 9sc at the back half loops, make sl-st at the tenth column, leave the thread to sew on.
Unicorn mane:
In order to avoid unnecessary seams on the seamy side of the hood, I tied the mane to the horn.
For the mane, I used YarnArt Jeans yarn in color numbers 19, 62 and 74.
Attach pink string to the half loop on the horn and dial 35 ch.
From the second stitch from the hook, work (2sc, inc) to the end of the chain, then sl-st at the end. Hide the threads inside the horn and tie them together in a knot.
In total, I made 9 such chains, ranging in length from 35 to 50 ch.
Hide all the strings in the horn and fill it a little with holofiber.
Sew the horn to the hood exactly in the middle, just behind the garter stitch.
Ears (2 parts):
Ears for giraffe and unicorns are knitted the same way.
1.6sc into magic ring
2. (1sc, inc) * 3 (9)
3.9sc
4. (2sc, inc) * 3 (12)
5.12sc
6. (3sc, inc) * 3 (15)
7.15sc
8. (4sc, inc) * 3 (18)
9.18sc
Leave the thread for sewing.
Fold the eyelet in half and sew with a few stitches.
Sew the ears to the hood at the same distance from the middle, leaving 4-5 rows from the garter stitch strip.
Giraffe horns (2 parts):
Start knitting with brown thread.
1.6sc into magic ring
2.6inc (12)
3-4. 12sc (2 rows)
5.6dec (6)
Change the thread to yellow.
6-9. 6sc (4 rows).
Leave the thread for sewing.
The horns can be filled a little.
Sew the horns to the hood, spaced apart, just behind the garter stitch.
The jumpsuit is ready.
Dress up your girls.