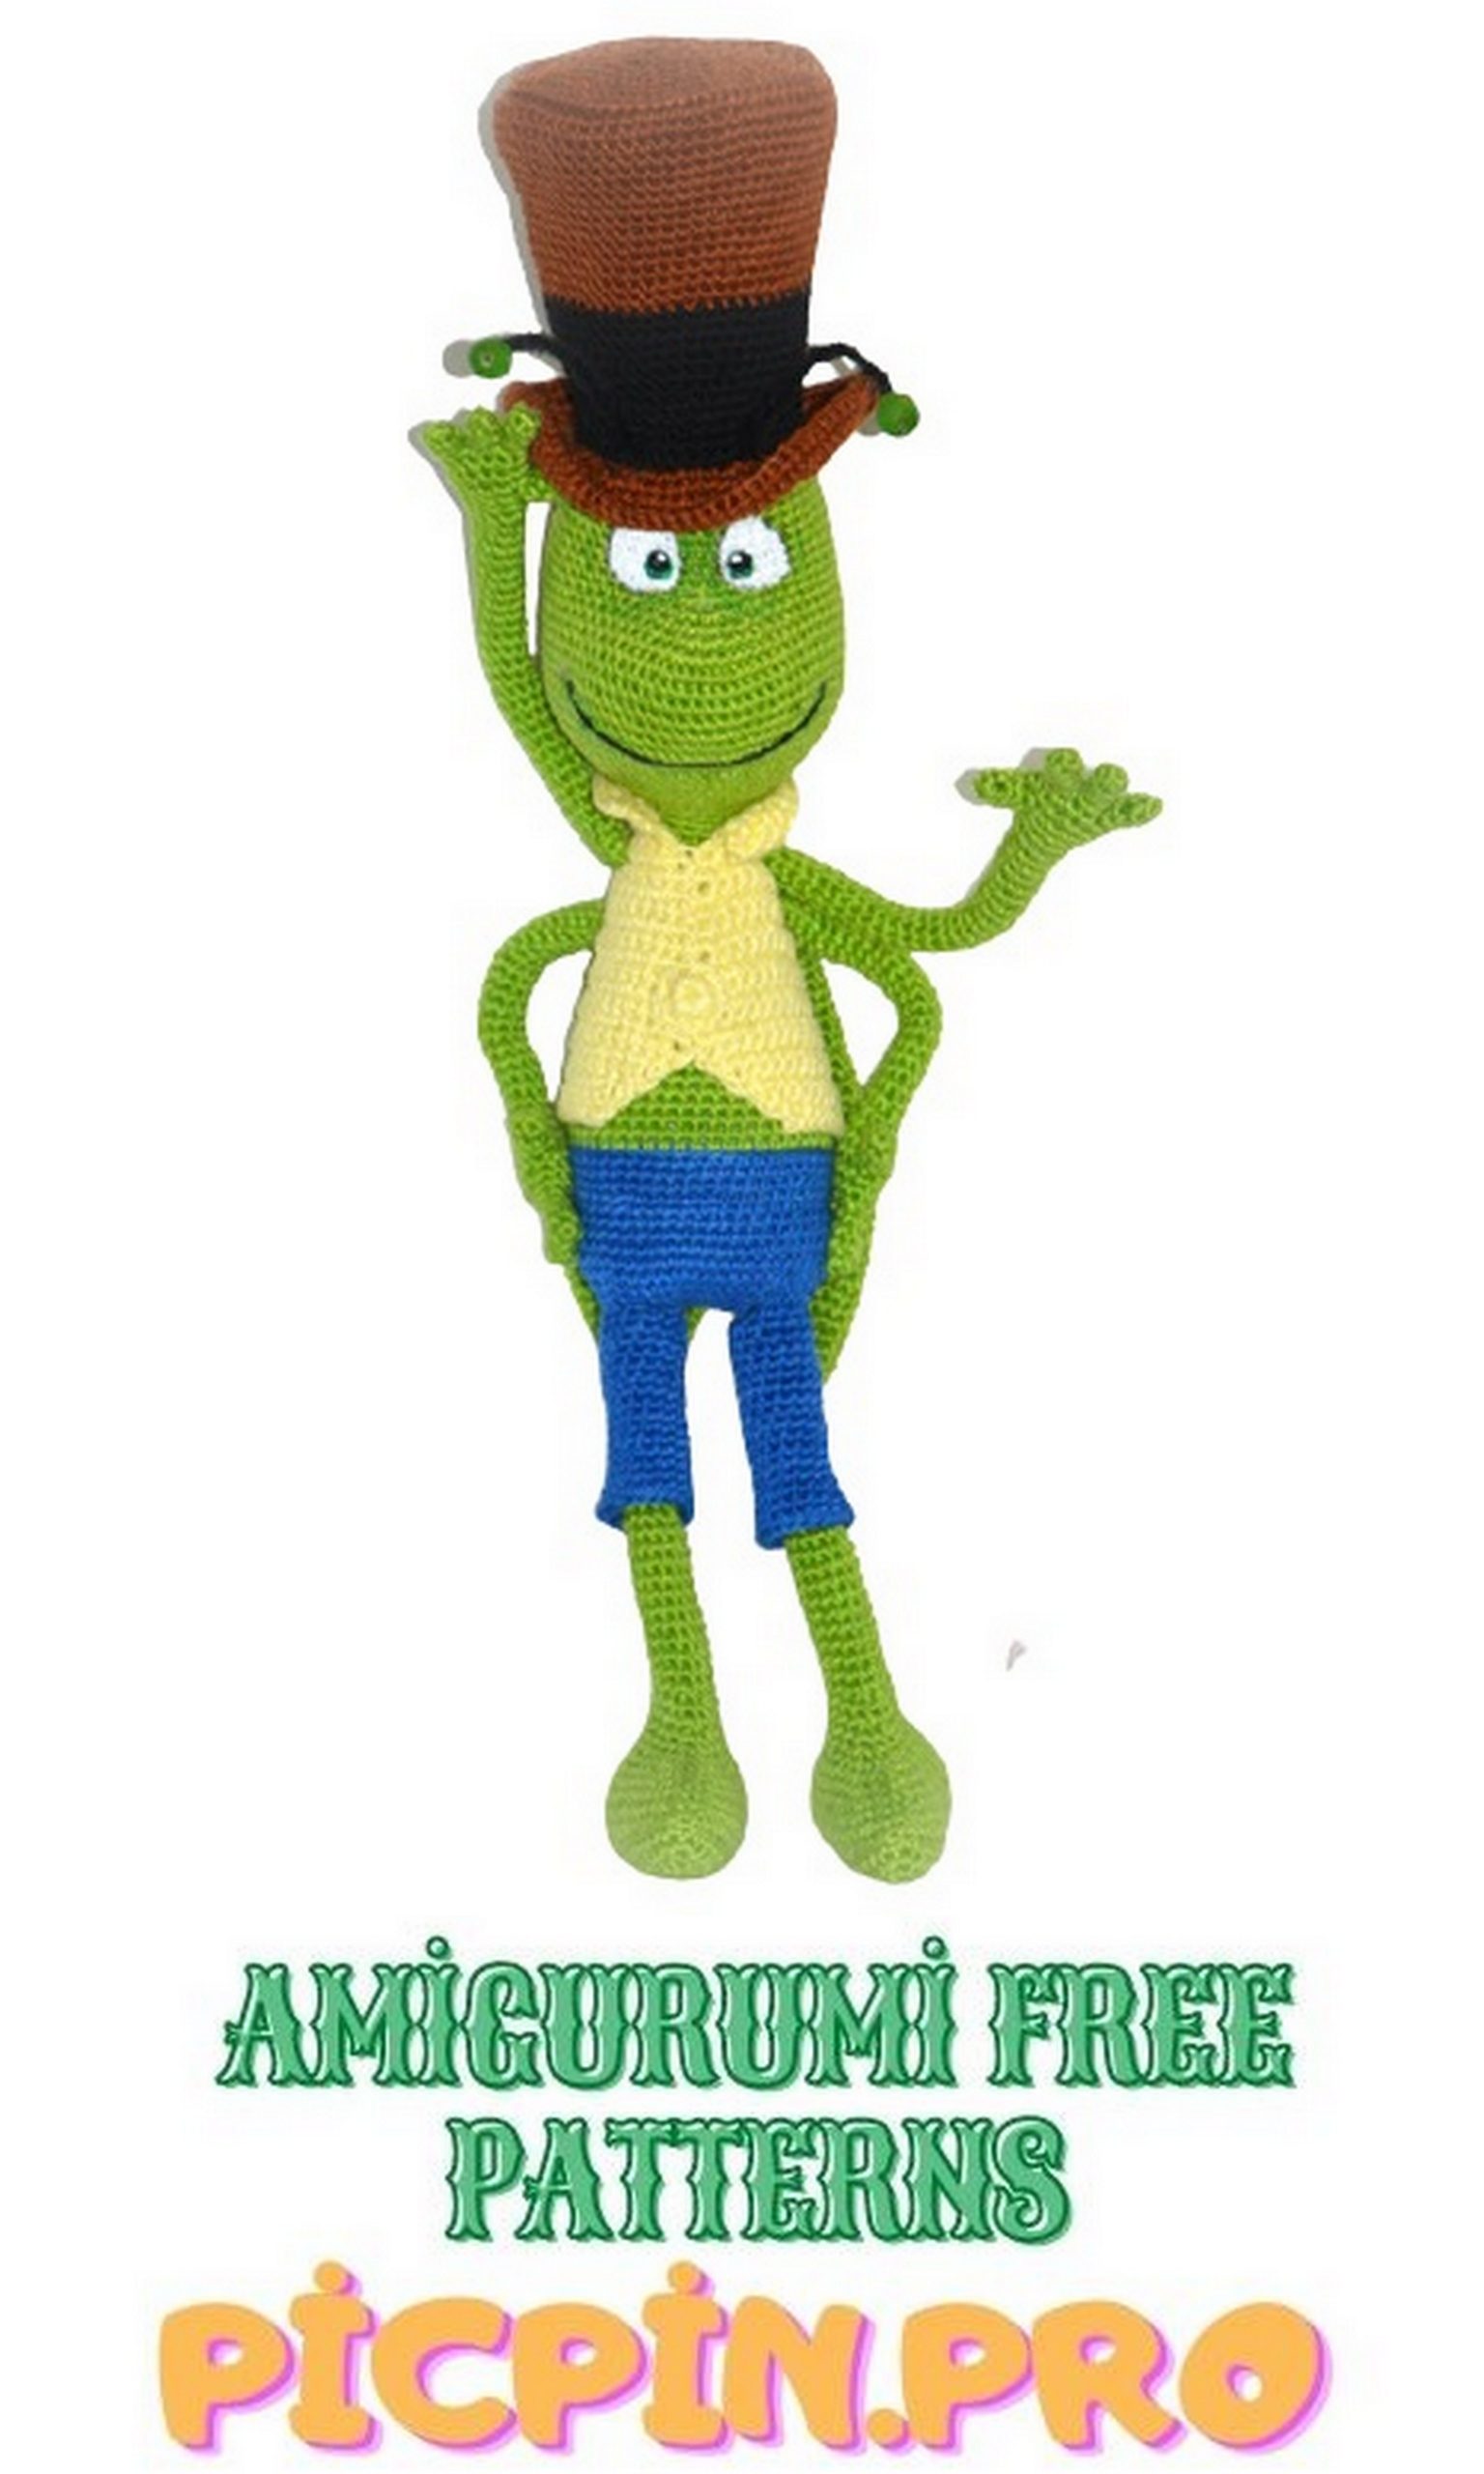
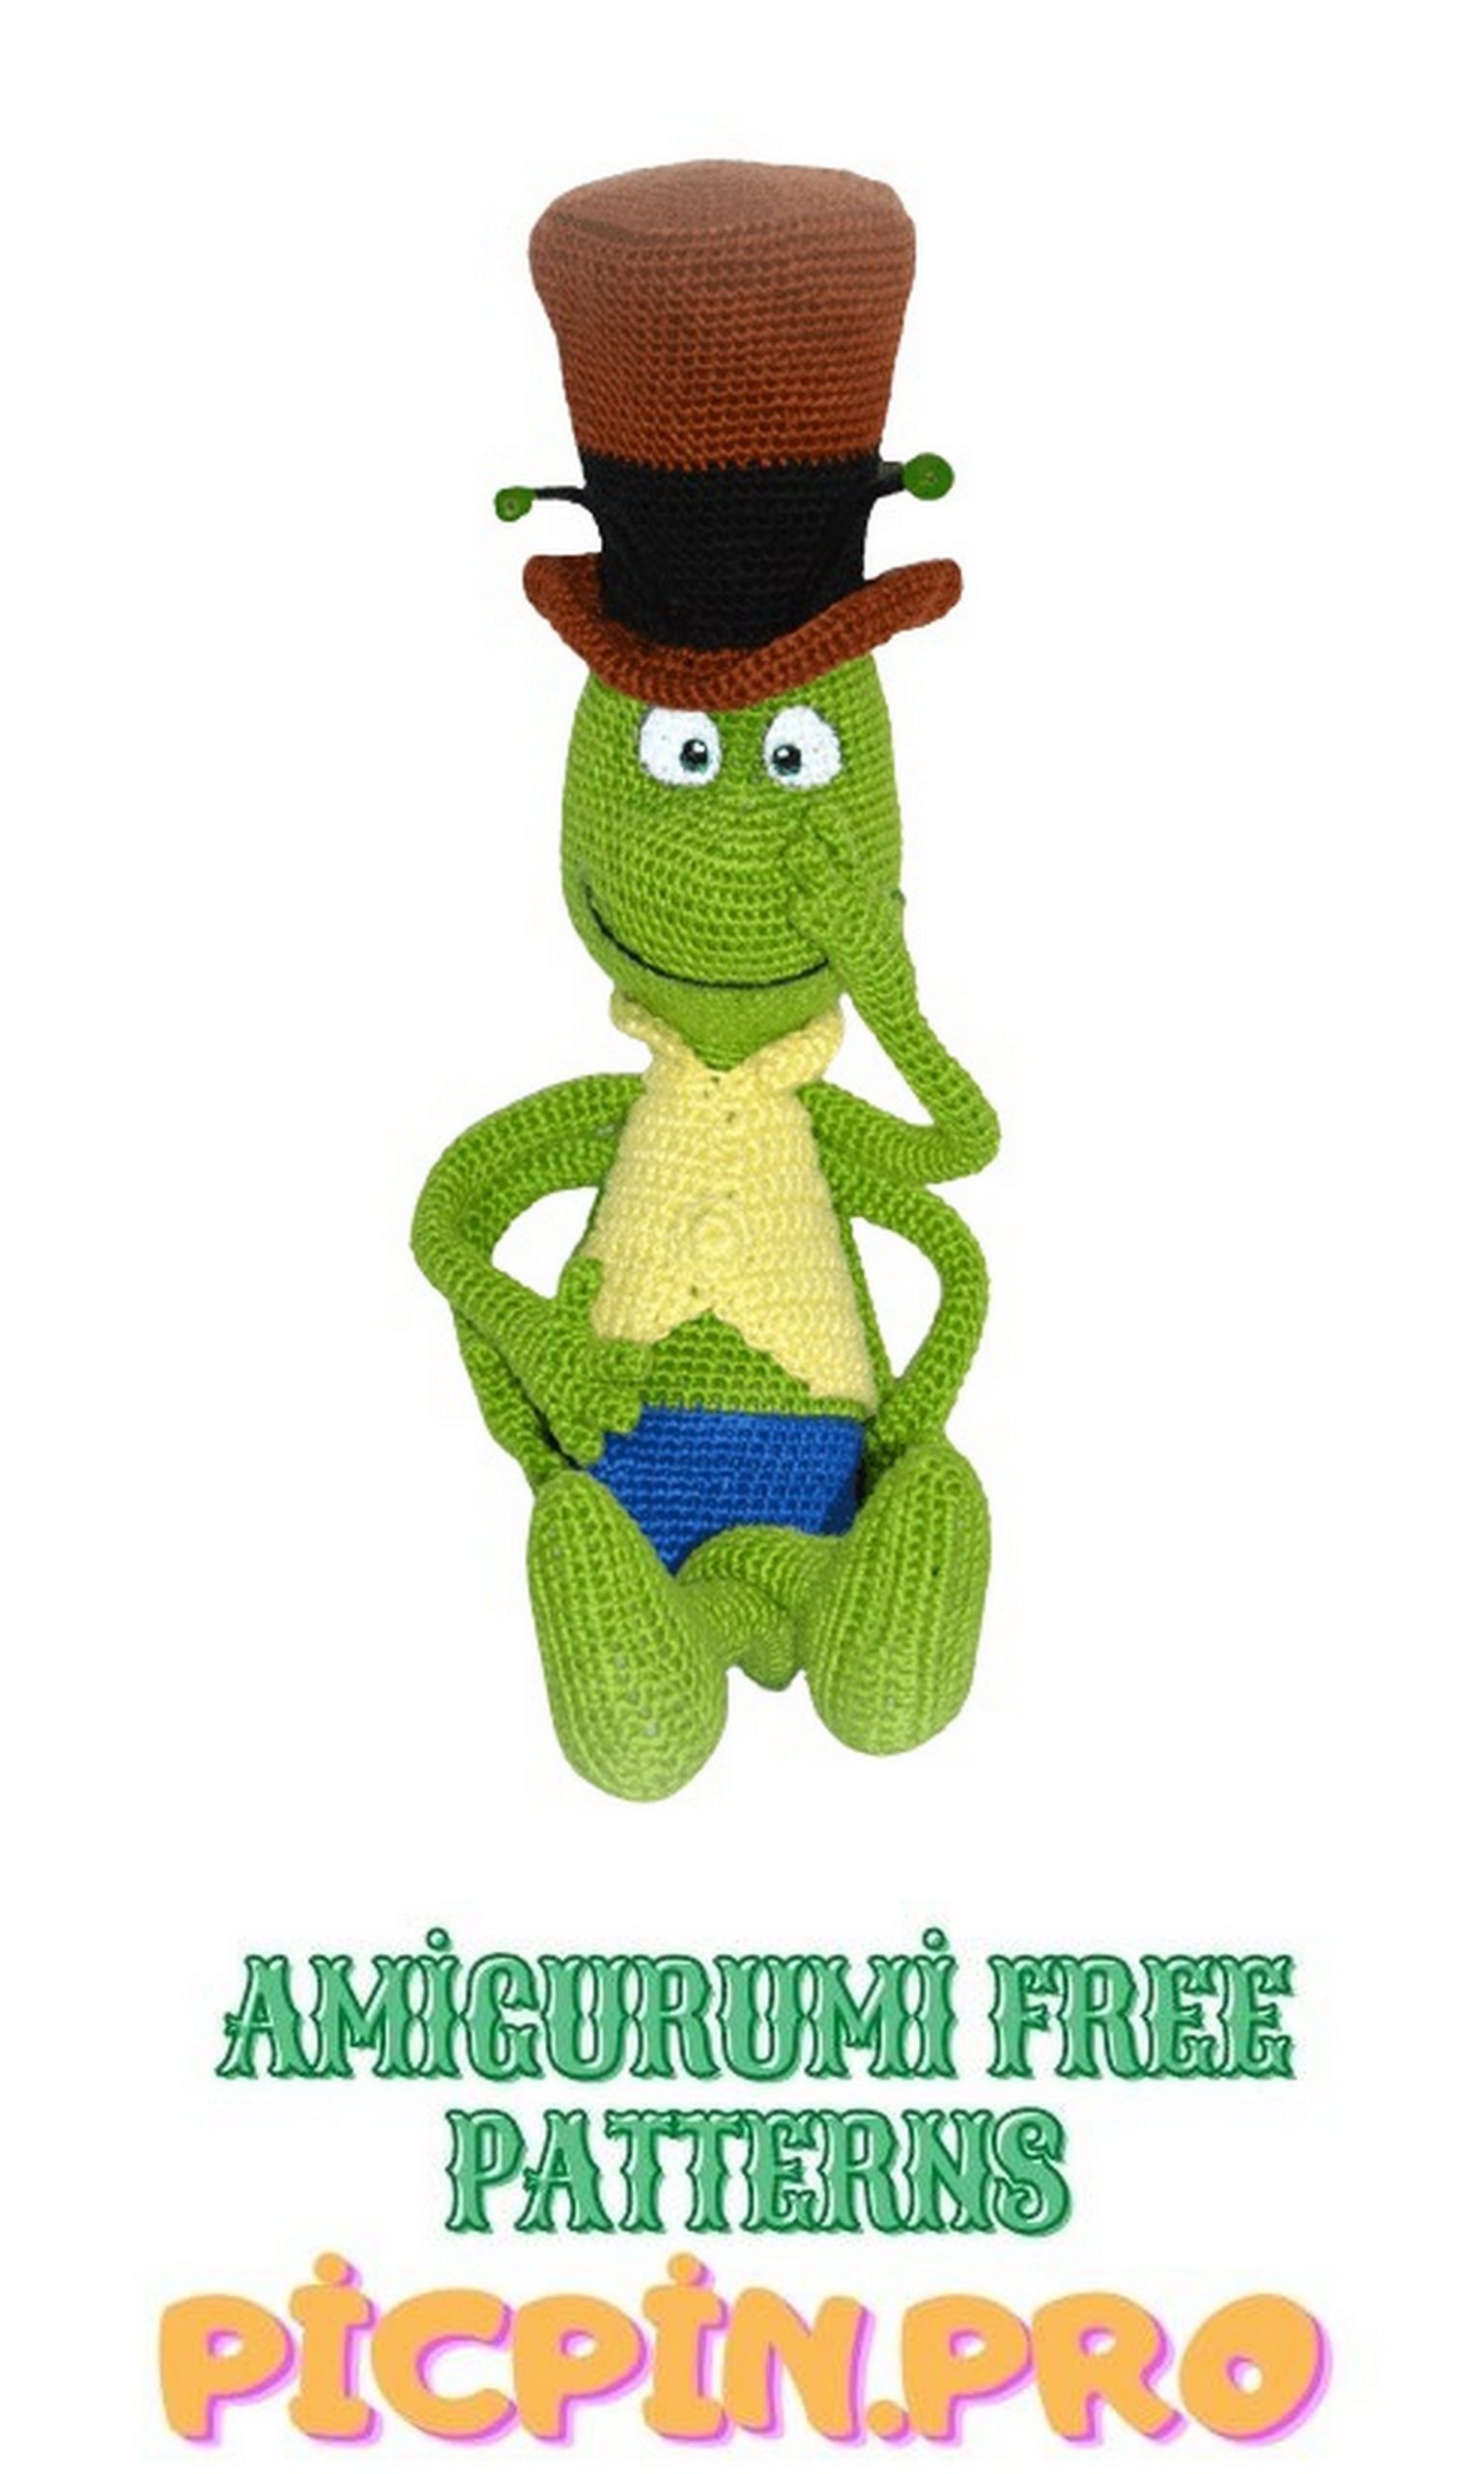
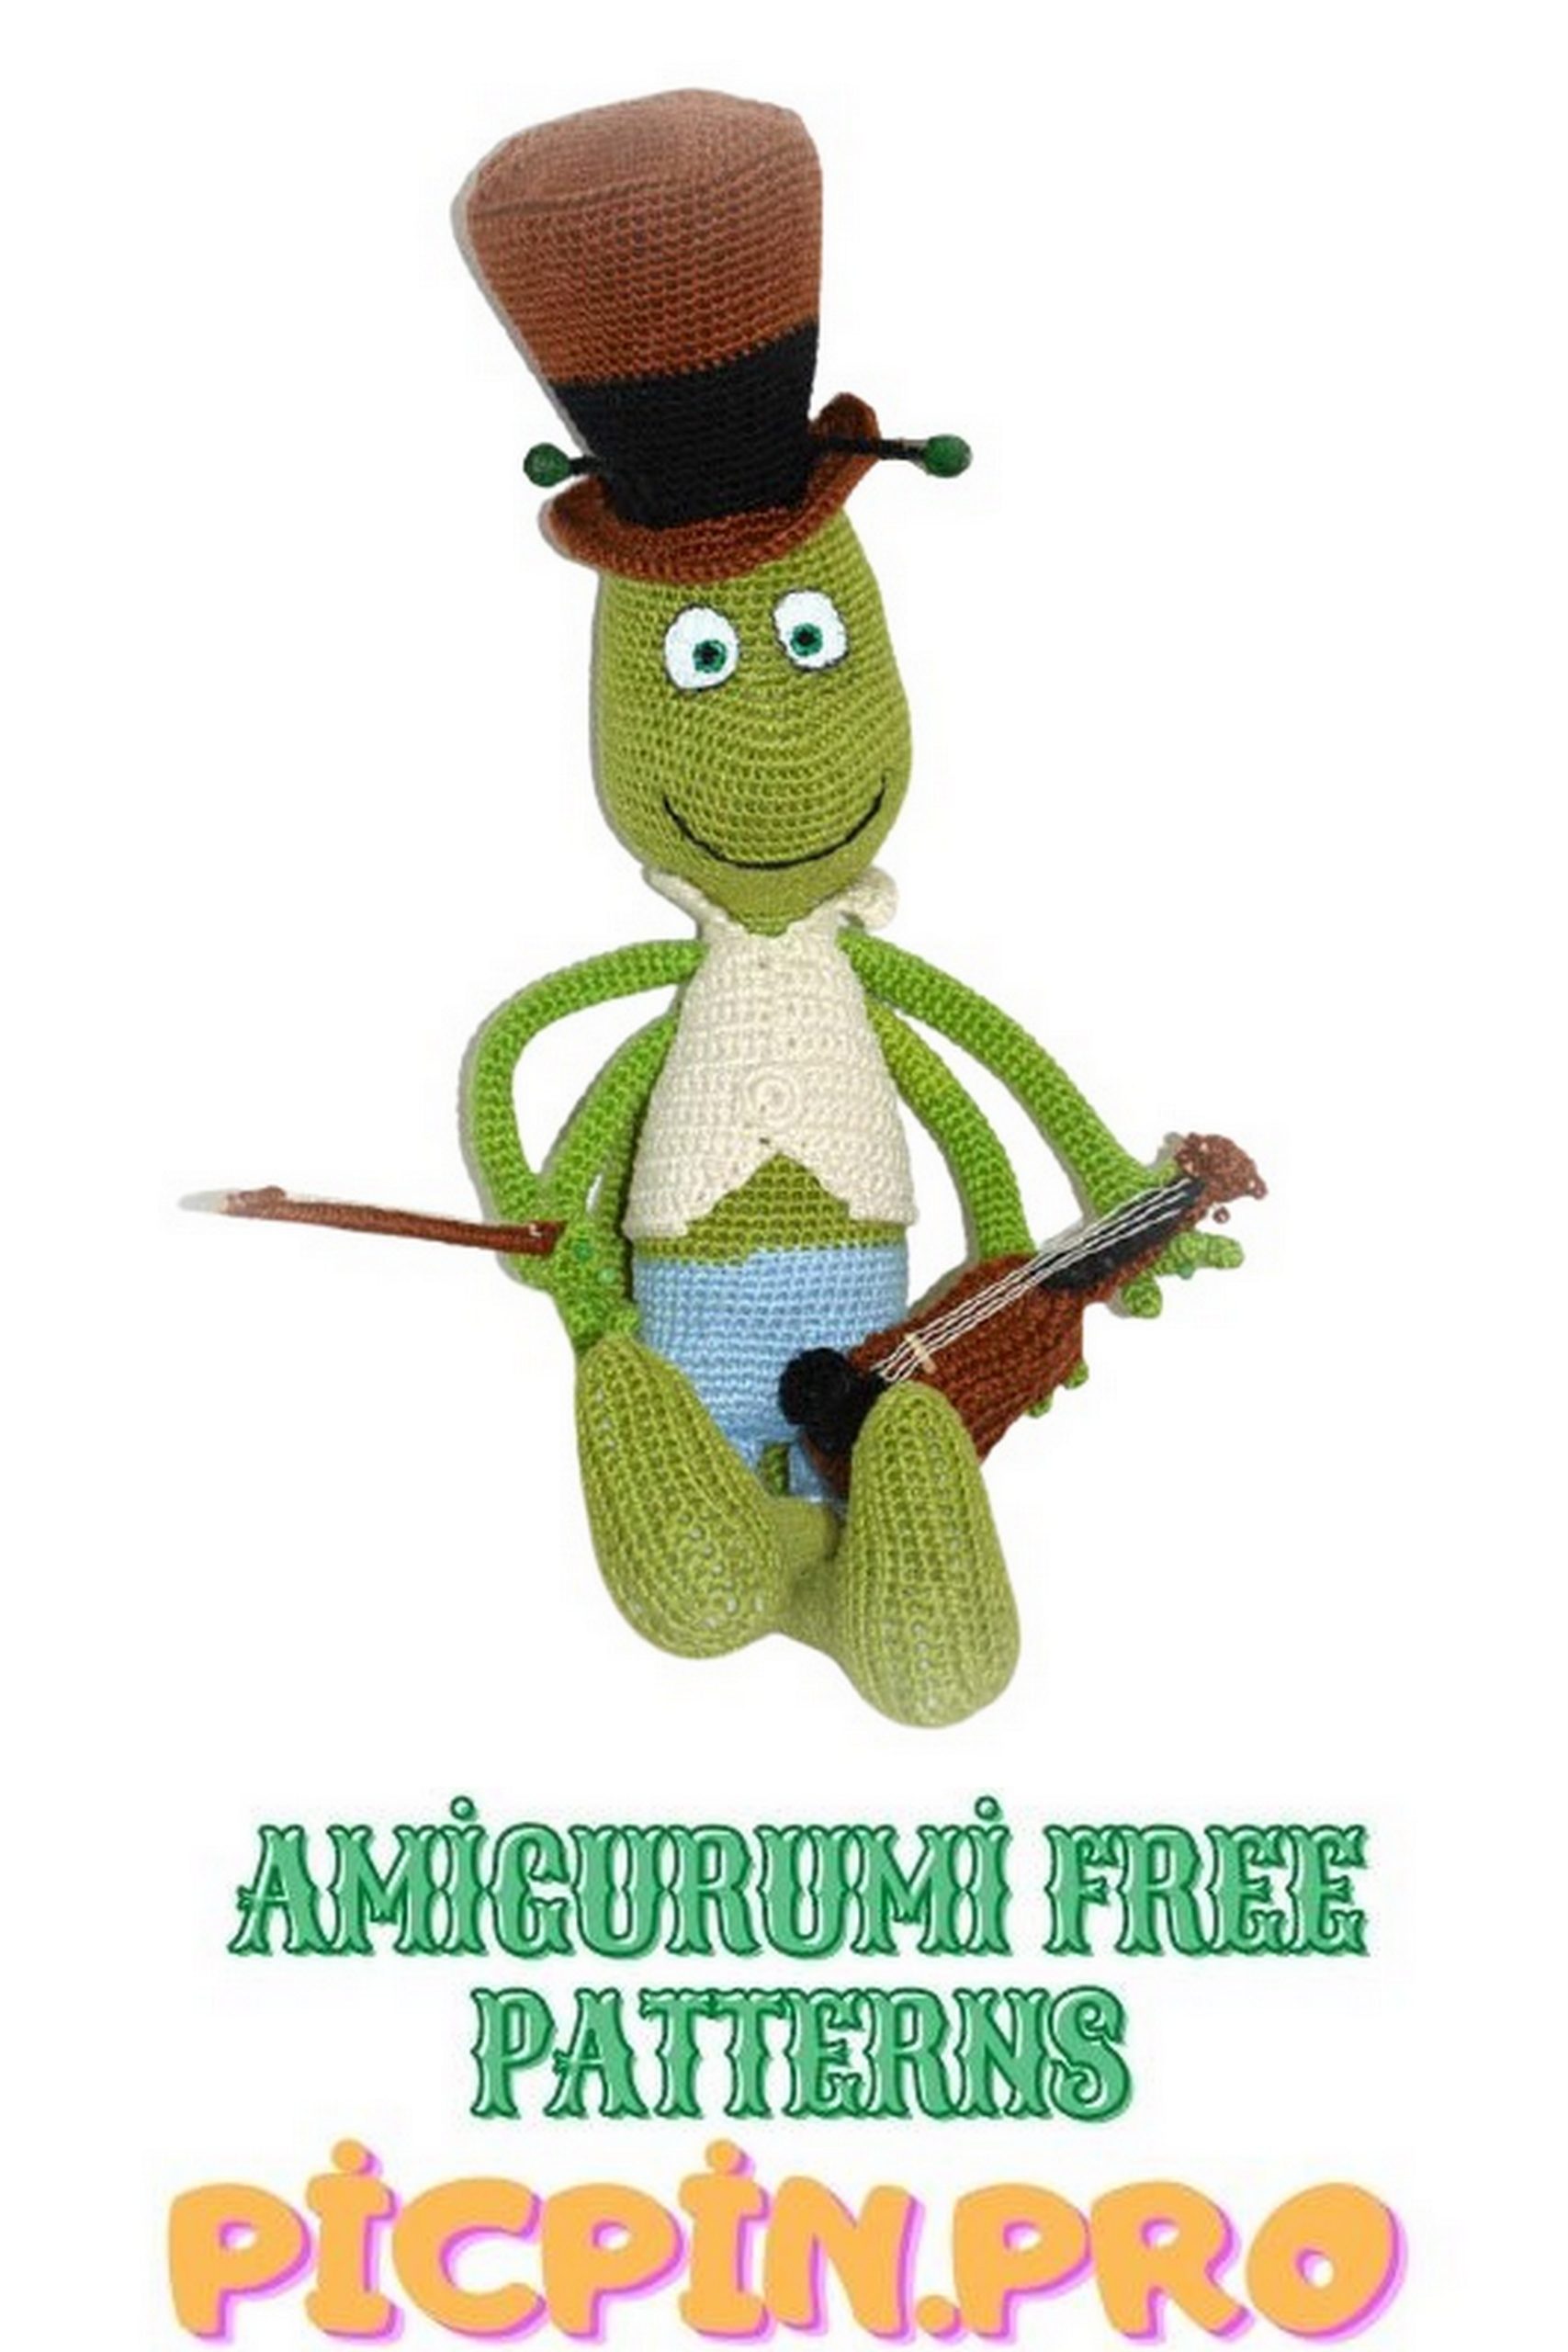
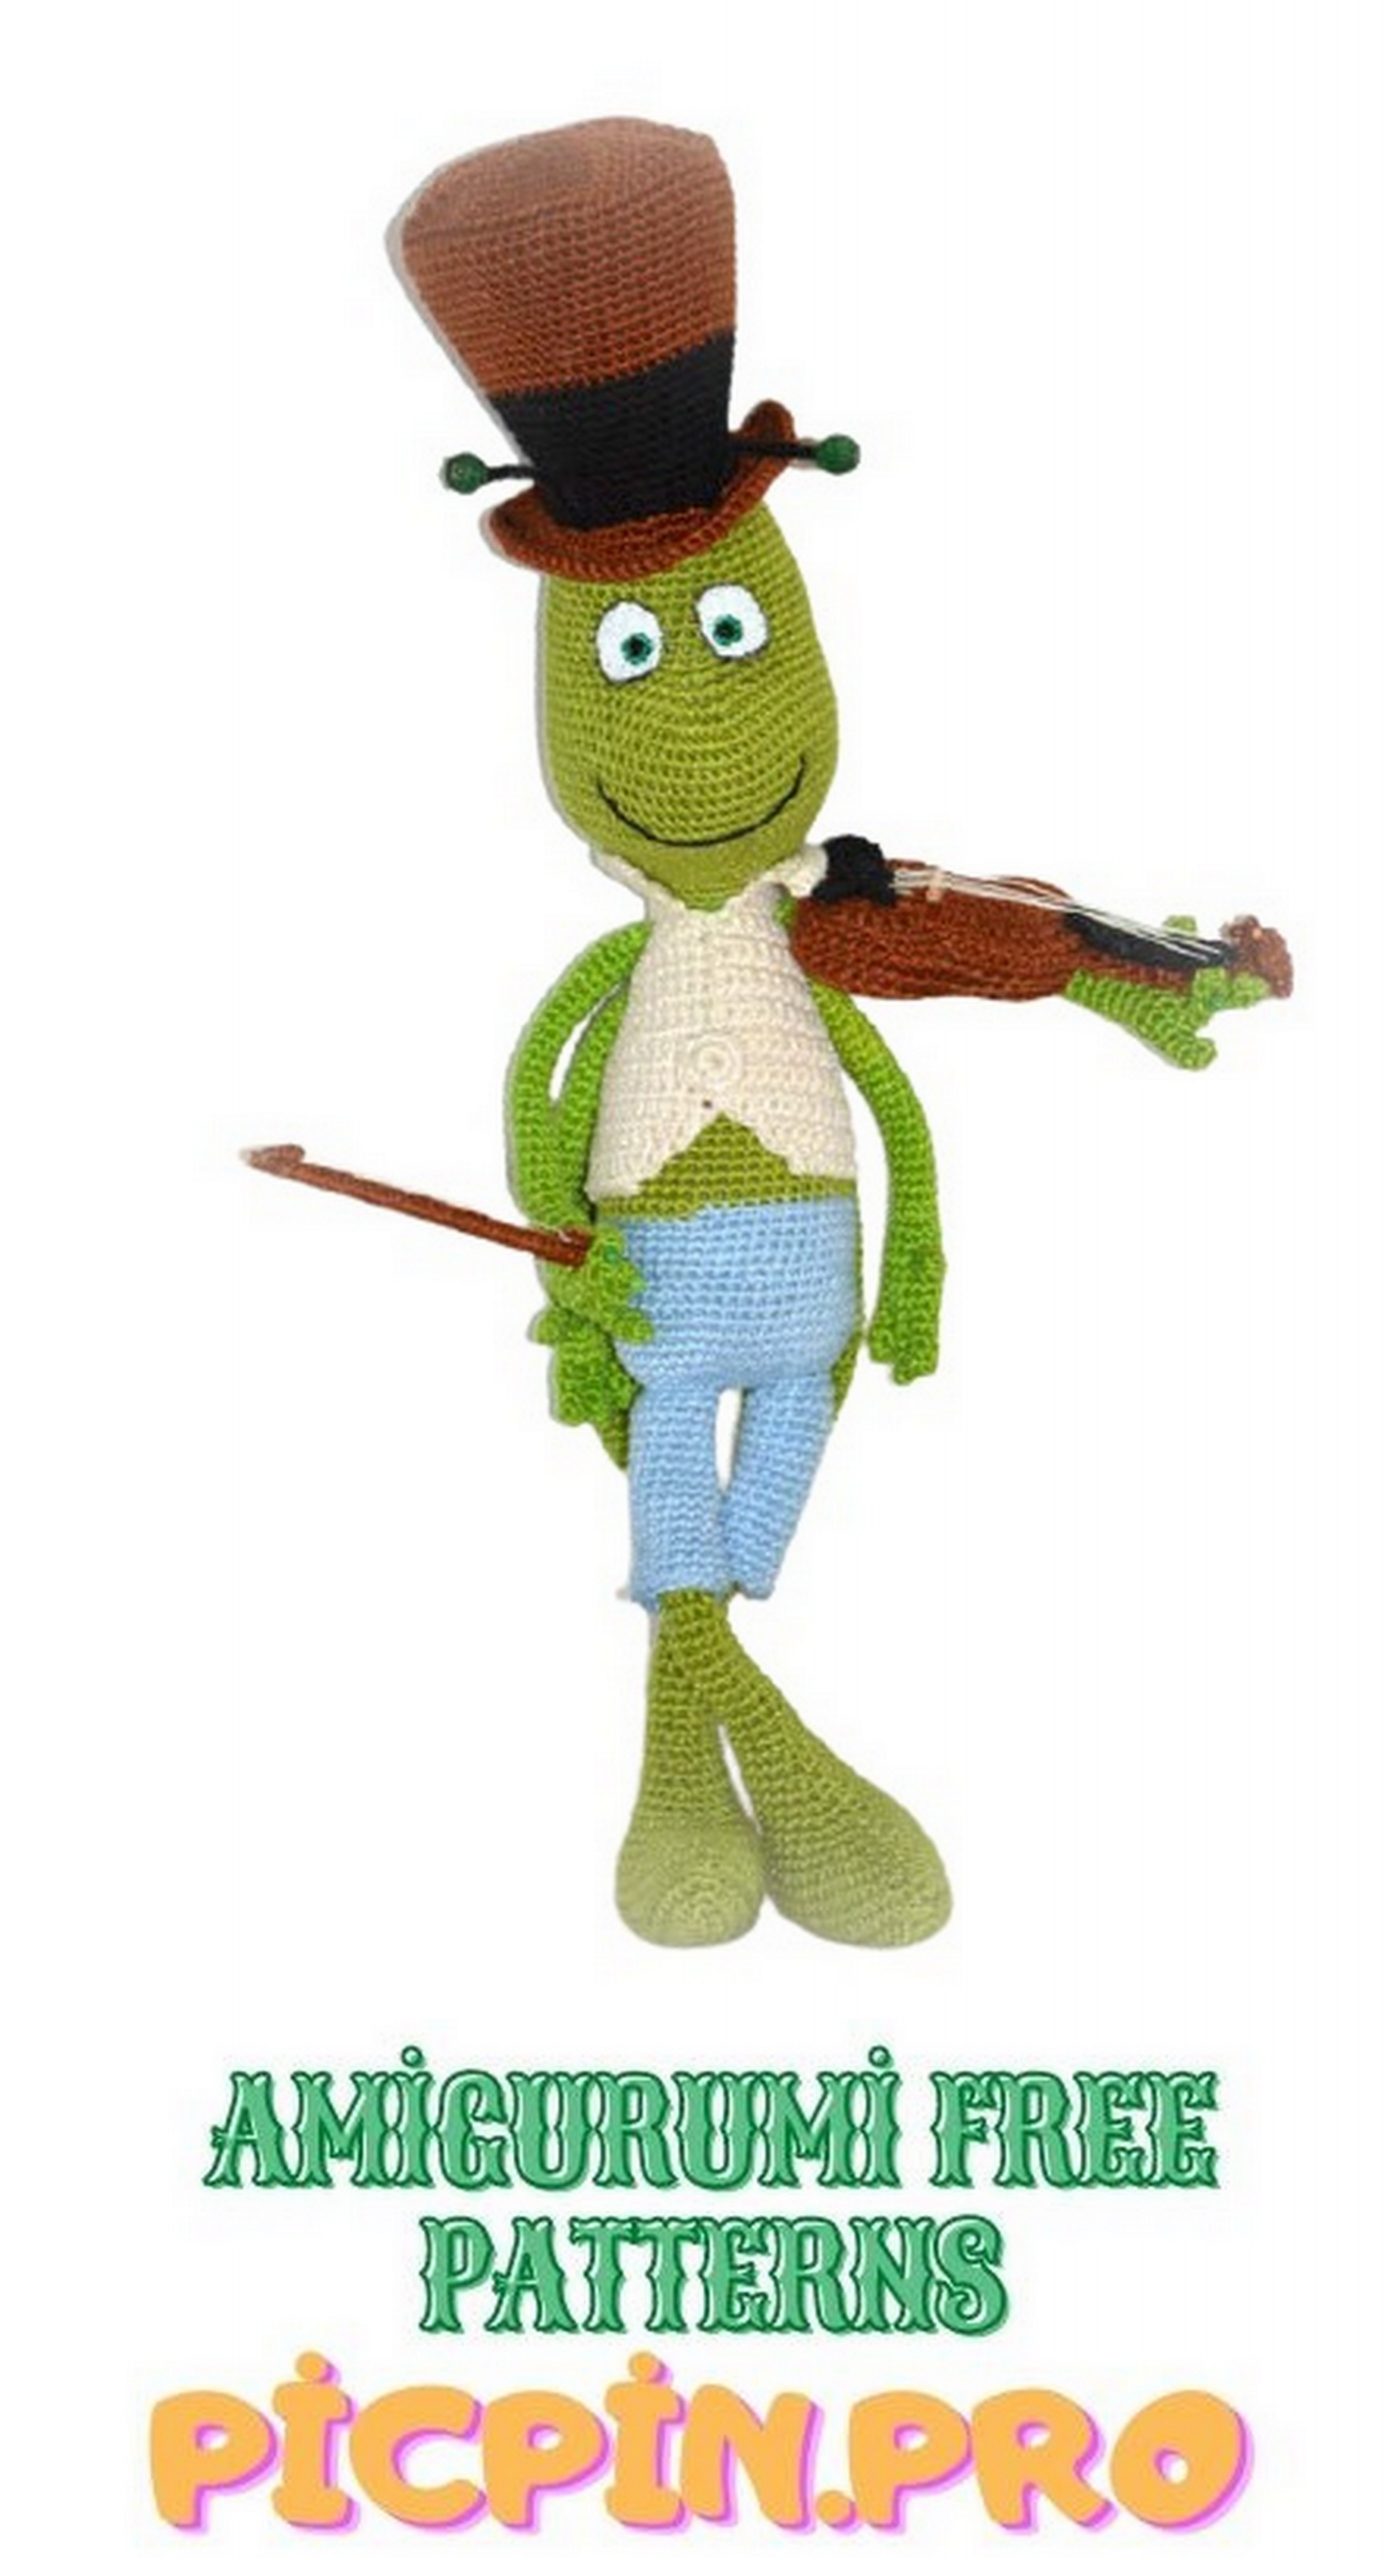
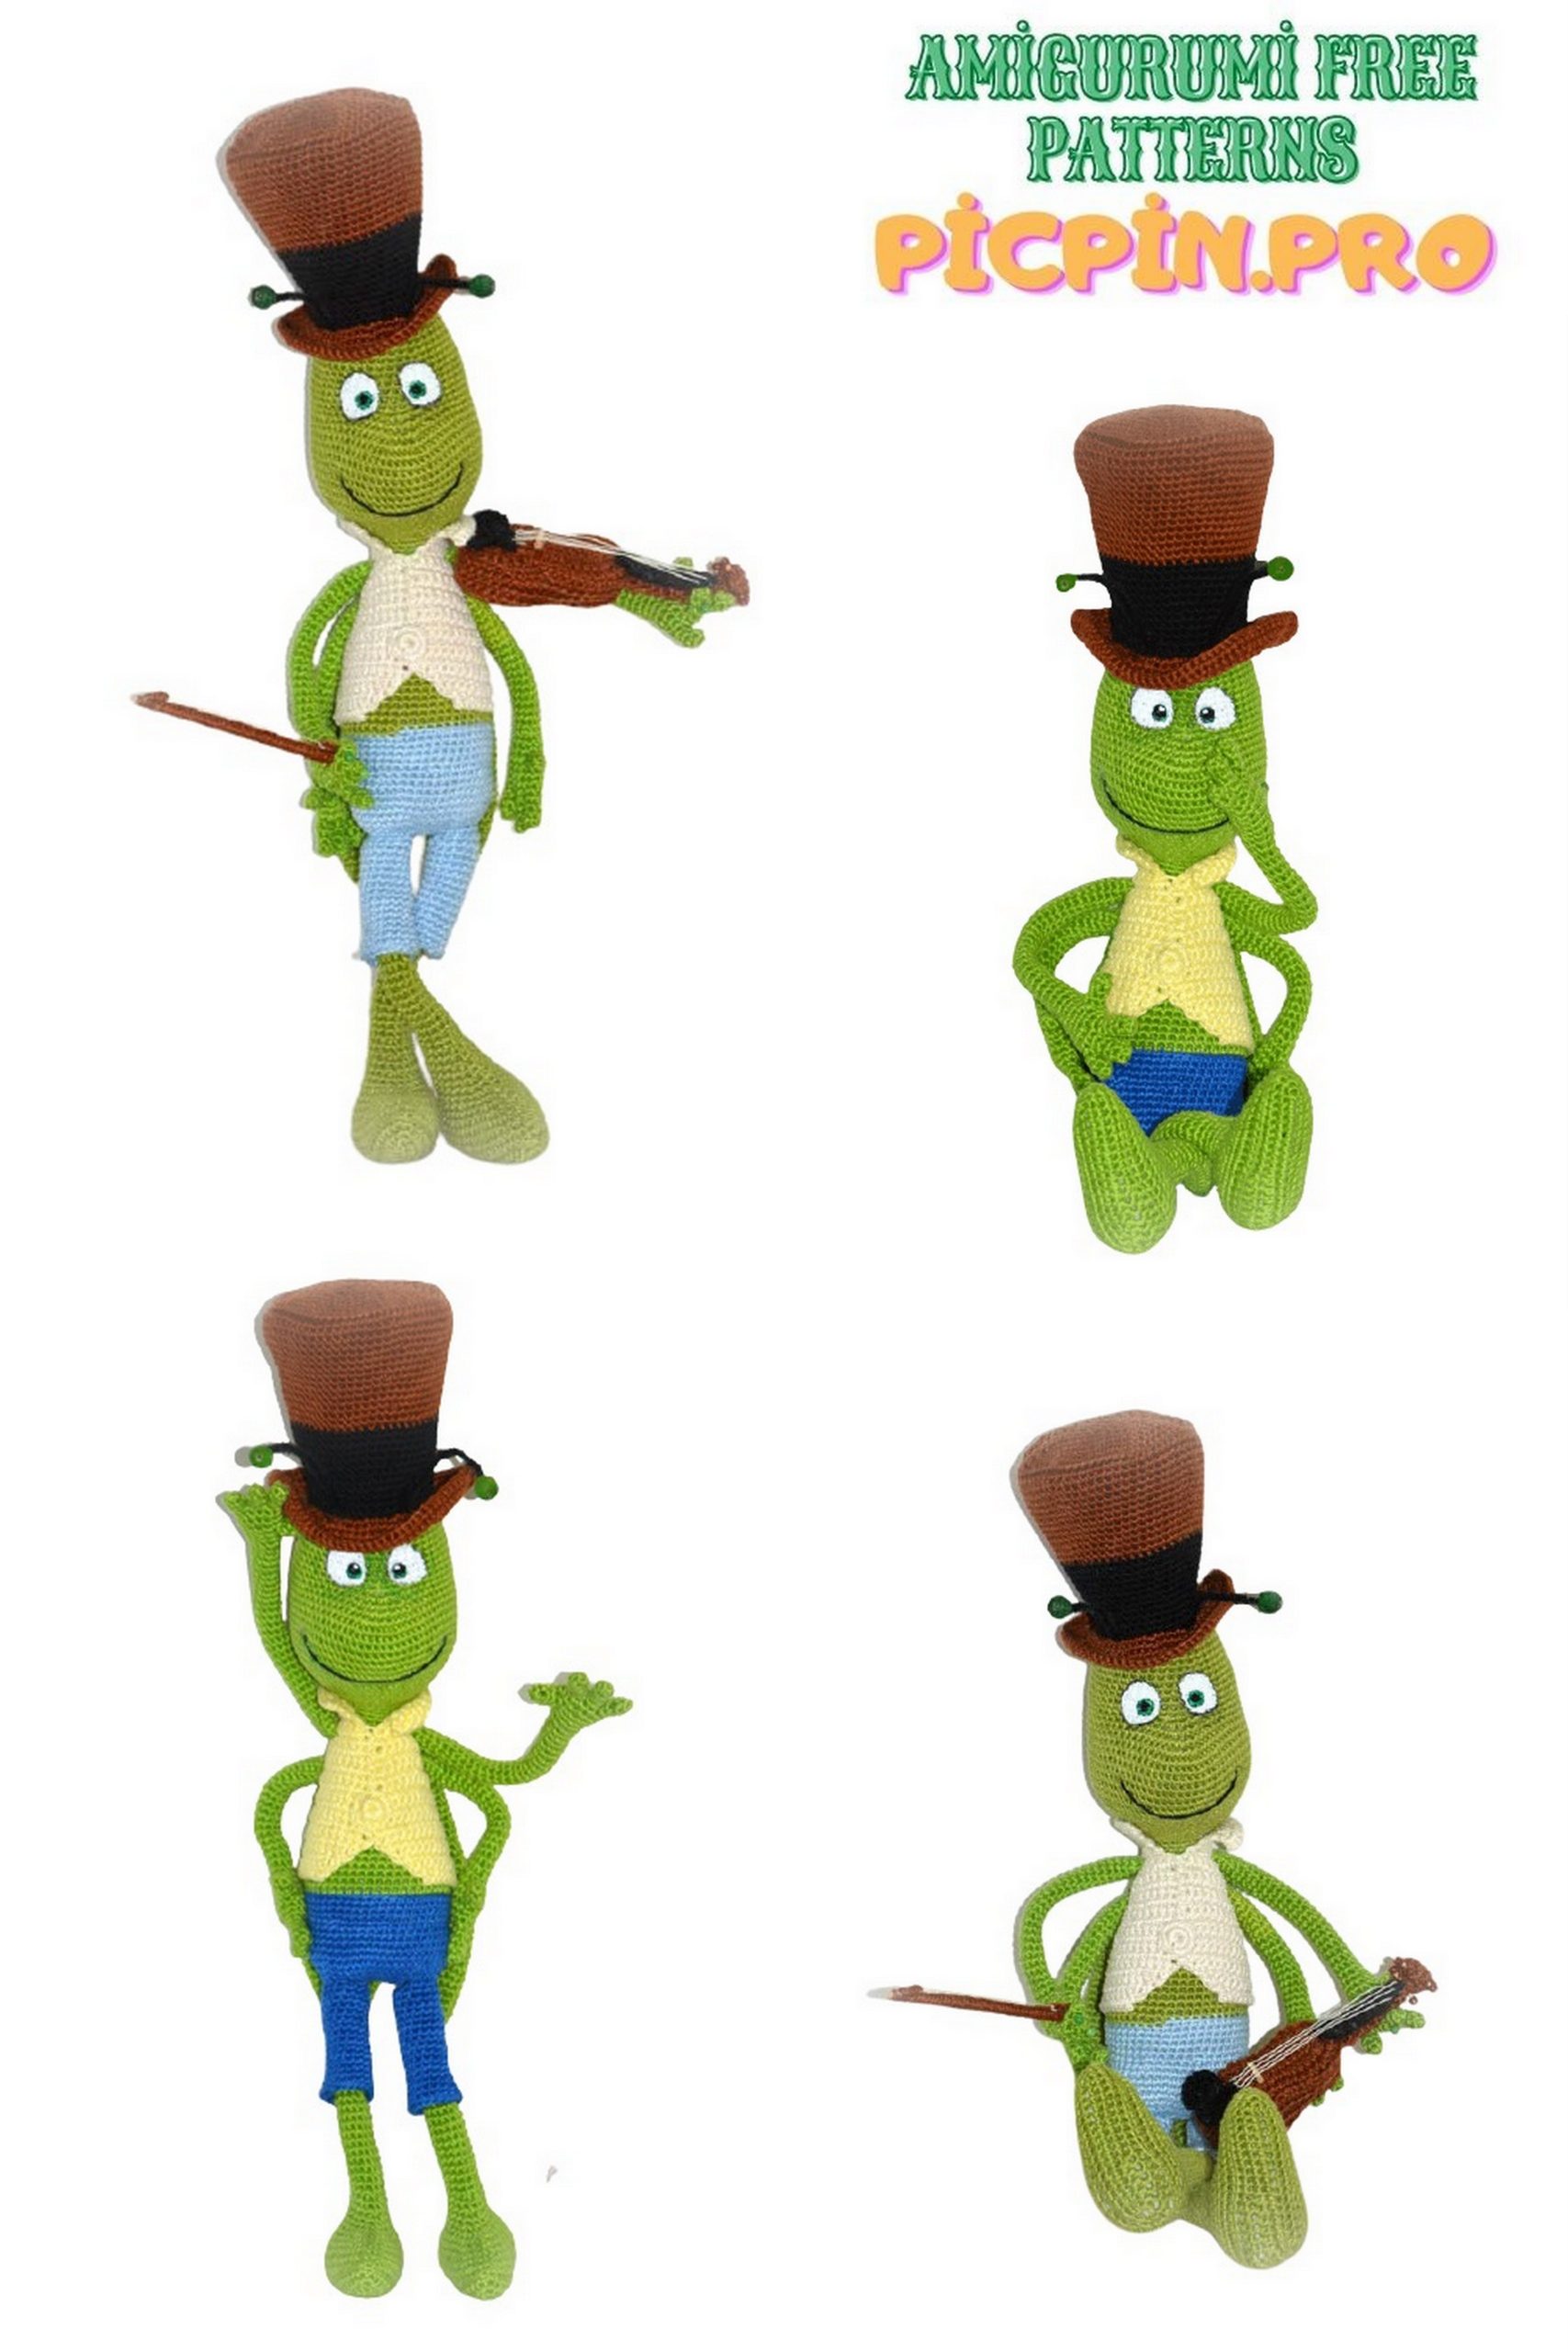
Cicada Flip Amigurumi Free Pattern
Pinterest Offical Page : Picpin.pro
Facebook Group: Amigurumi Free Patterns
Facebook Offical Page: Free Amigurumi Picpin
I am sharing very beautiful and unique amigurumi animal patterns with you for free. You will love this wonderful amigurumi cicada pattern.
Materials needed:
– 2,0 mm crochet hook
– sport weight cotton yarn in:
– green (for Flip’s head, body, arms, legs and wings)
– brown (for the hat)
– black (for the hat)
– light blue (for Flip’s shorts)
– white or ecru (for the vest)
– stuffing of your choice
– wire or pipe cleaners for mounting into arms and legs (optional)
– cotton darning needle for sewing
– textile paints in white, green and black for the eyes,
– brush for textile paints
– wire or black pipe cleaners for antennas
– green beads for antennas ends
Finished size:
Standing from toes to top of the hat 45 cm (17.7 “)
Abbreviations:
(US terminology)
st(s) stitch(es)
sl st slip stitch
sc single crochet
ch chain
hdc half double crochet
dc double crochet
inc increasing stitch
(2 single crochet stitches worked in one stitch)
dec decreasing stitch
(two stitches together, invisible decrease used in this pattern)
FO fasten off
Work in continuous rounds unless otherwise specified.

Head
use green colored yarn
R1 sc8 in magic ring 8
R2 inc8 16
R3 (inc, sc) x8 24
R4 (inc, sc2) x8 32
R5-R6 sc32
R7 (inc, sc3) x8 40
R8-R10 sc40
R11 (inc, sc9) x4 44
R12-R14 sc44
R15 (inc, sc10) x4 48
R16-R18 sc48
R19 sc10, inc4, sc34 52
R20 sc12, inc4, sc36 56
R21 sc14, inc4, sc38 60
R22 sc16, inc4, sc40 64
R23-R32 sc64
R33 sc2, (dec, sc2) x7, dec, sc32 56
R34 sc2, (dec, sc) x7, dec, sc31 48
R35 sc48
R36 (dec, sc4) x8
R37 sc40
R38 (sc3, dec) x8
R39 sc32
R40 (dec, sc2) x8
R41 sc24
R42 (sc2, dec) x6 18
R43-R45 sc18
fasten off
Stuff head nice and firm.
Pay special attention to nose area.
Stuff it nice, firm and even.
Legs
(make 2)
use green colored yarn
start with ch18
note:
you can work sole and foot in rows, starting each round with ch1, and ending with slip stitch in this first chain made.
I decided to work this way to keep rounds nice and even (and was easier for me to count the stitches); spiral started to work at round 17.
Try and see which way suits you better or you prefer to work with.
If you decide to work in rounds, don’t forget to chain 1 at the beginning of each round and slip stitch at the end to finish the round. Chain and slip stitch are not mentioned in the pattern.
R1 sc16, 3sc in the last chain stitch, continue working around chain, sc15, 2sc in the last stitch on this side of chain (if you don’t know how to make an oval from chain, look at the photo you can find at the last page of this pattern) 36
R2 ch1 (worked to alter the stitch to look even when starting and ending with hdc) inc hdc, hdc next 5 sts, sc11, 3sc in 1 st, sc11, hdc next 5 sts, (inc hdc) x2 41
R3 hdc, inc hdc, 5x hdc, sc12, inc x2, sc12, 5 x hdc, inc hdc, hdc, inc hdc 46
R4 back loops only, sc46
R5 sc20, dec, dc, dec, dc21 44
R5 sc20, dec2, sc20 42
R6 sc16, dec4, sc18 38
R7 sc, dec, sc11, dec4, sc12, dec, sc2 32
R8 dec, sc9, dec4, sc11, dec 26
R9 (sc2, dec) x2, sc2, dec2, sc2, (dec, sc2) x2, sc2 20
R10 sc8, dec2, sc8 18
R11 sc18
R12 sc7, dec2, sc7 16
R13 sc16
R14 sc6, dec2, sc6 14
R15 sc14
R16 sc5, dec2, sc5 12
R17-R26 sc12
R27 (dec, sc4) x2 10
R28-R42 sc10
fasten off.
Shorts
make trousers with blue colored yarn start with chain 12, sl st last to first chain stitch to form circle and work in rounds
R1-R2 sc12
R3 (inc, sc5) x2 14
R4-13 sc14
R14 (inc, sc6) x2 16
R15 sc16
R16 (inc, sc7) x2 18
R17 sc18
mount trousers over legs and sew through both leg loops and back loops of trousers.
Front loops over trousers we’ll use to connect and start with body making.

Connecting legs and working the body
(continue working with blue colored yarn)
Connect legs with making bridge over three stitches and three rows across inner thigh sides.
(look photo above). Once bridge is made, continue with 1st round below.
R1 work around making 24 sts (9 each leg and 3 sts front and back bridge part) 24
R2 (inc, sc3) x6 30
R3 (inc, sc4) x6 36
R4 (inc, sc5) x6 42
R5 (inc, sc6) x6 48
R6-R9 sc48
R10 (dec, sc4) x8 40
R11 (inc, sc4) x8 48
R12-R14 sc48
R15 back loops only sc48
R16-R17 sc48
from now on, when there will be decreasing stitches in the round, decrease them on sides of the body (you will have these side decreases in the R18 & R20).
I will write you a note on the beginning of the round to remind you.
R18 dec1 on each side of the body, sc rest of 44 stitches 46
R19 sc46
R20 dec1 on each side of the body, sc rest of 42 stitches 44
R21 sc44
R22 (dec, sc9) x4 40
R23-R24 sc40
R25 (dec, sc8) x4 36
R26-R27 sc36
R28 (dec, sc7) x4 32
R29-R30 sc32
R31 (dec, sc6) x4 28
R32-R33 sc28
R34 (dec, sc5) x4 24
R35-R36 sc24
R37 (dec, sc2) x6 18
change color to green fasten off leaving long tail for sewing body and head together.
Stuff the body nice and firm.
work in green colored yarn
Arms
Make fingers first
Thumb
R1 sc4 in magic ring
R2-R4sc4
FO
Fingers (x2)
R1 sc4 in magic ring
R2-R5 sc4
FO
Right arms
Working finger
(one we will connect all other fingers to and start with making hand/arm)
R1 sc4 in magic ring 4
R2-R4 sc4
R5 sc2, bring one of fingers on and sc2 over that one, bring second finger and sc4 over it, now, as you work turned naturally, continue working the hand, sc 2 over middle finger, sc2 over pinkie finger (working one we started this round with) 12
R6-R7 sc12
R8 sc5, bring thumb on, and sc 2 sts, working through both, thumb and hand sts, sc5 12
R9 sc5, sc2 over thumb only, sc5 12
R10-R11 sc12
R12 (dec, sc2) x3 9
R13-R37 sc9
Shorter arm
Make fingers following the pattern given above.
Then repeat the working finger/hand pattern all the way through R13.
From R13, instead of 25 repeating rounds, on shorter arm make them just 20
Your last round count and the pattern will look like this:
R13-R32 sc9
fasten off leaving long tail for sewing arm to the body later.
Left arm
Make fingers as written for the right arm patterns. Follow the pattern until you reach R8 & R9 of the hand making (where thumb is added).
Only two rounds are different!!!!
Once you finish them, return to right arm pattern and follow further directions.
R8 sc6, bring thumb and sc2, working through both, thumb and hand sts, sc4
R9 sc6, sc2 over thumb only, sc4
continue with the rest of the pattern. Repeat this for both left arms.
Following photo shows you how arms are sewed on the body. Sew longer arm two rounds below neck connection. Shorter one is placed 4 rounds lower.
Wings
work in green colored yarn
make 2 triangles:
R1 sc 4 in magic ring 4
R2 (inc, sc) x2 6
R3 (inc, sc2) x2 8
R4 (inc, sc3) x2 10
R5 (inc, sc4) x2 12
R6 (inc, sc5) x2 14
R7 (inc, sc6) x2 16
R8 (inc, sc7) x2 18
R9 (inc, sc8) x2 20
R10 (inc, sc9) x2 22
R11 (inc, sc10) x2 24
R12-R14 sc24
first triangle fasten off, use second one to connect both pieces together and continue with making wing.
R15 bring first triangle sc over both pieces 48 sc around 48
R16-R25
R26 sc12, dec, sc23, dec, sc9 46
R27 sc46
R28 sc12, dec, sc22, dec, sc8 44
R29 sc44
R30 (dec, sc9) x4 40
R31-R32 sc40
R33 (dec, sc8) x4 36
R34-R35 sc36
R36 (dec, sc7) x4 32
R37-R38 sc32
R39 (dec, sc6) x4 28
R40-R41 sc28
R42 (dec, sc5) x4 24
R43-R44 sc24
R45 (dec, sc2) x6 18
R46-R47 sc18
fasten off leaving long tail for sewing wings to the collar of the vest.


Vest
using white or cream color yarn
start with ch21
work in rows (ch1, turn after each row is finished)
R1 sc5
R2 inc, sc4
R3 sc6
R4 inc, sc5
R5 sc7
R6 inc, sc6
R7 sc8
R8 inc, sc7
R9 sc9
R10 inc, sc8
R11 sc10
R12 inc, sc9
R13 sc11
R14 sc9, dec
R15 dec, sc8
R16 sc7, dec
R17 dec, sc6
R18 sc5,dec
fasten off, hide end repeat above starting from the opposite end of base chain
Collar
slip stitch to one of chain ends, working opposite direction from the vest.
R1 sc20
R2 inc, sc18, inc
R3 inc sc20, inc
R4 inc, sc22, inc
R5 inc, sc24, inc
R6 inc, sc26, inc
Button
ch4
sl st last to first chain stitch, ch1
work 10 sc over chain stitches
Mount the vest on the Flip’s body. Using same color yarn you used for the vest, sew the front, add the button. You can sew the vest on Flip’s body, or you can glue it.
Hat
start with brown color yarn
R1 sc8 in magic ring 8
R2 inc x8 16
R3 (inc, sc) x8 24
R4 (inc, sc2) x8 32
R5 (inc, sc3) x8 40
R6 (inc, sc4) x8 48
R7 (inc, sc5) x8 56
R8 (inc, sc6) x8 64
R9 (inc, sc7) x8 72
R10 sc 72 in back loops only
R11 (dec, sc16) x4 68
R12-R13 sc68
R14 (dec, sc15) x4 64
R15-R16 sc64
R17 (dec, sc14) x4 60
R18-R19 sc60
R20 (dec, sc13) x4 56
R21-R22 sc56
R23 (dec, sc12) x4 52
R24-R25 sc52
R26 (dec, sc11) x4 48
R27-R28 sc48
R29 (dec, sc10) x4 44
R30-R31 sc44
R32 (dec, sc9) x4 40
R33-R34 sc40
R35 ((inc, sc2) x5, inc, sc9) x2 62
R36 sc62
R37 ((inc, sc3) x5, inc, sc10) x2 74
R38 sc74
R39 ((inc, sc4( x5, inc, sc11) x2 86
R40 sc86
Fasten off, hide ends.
Stuff the hat lightly, and sew it on top of the head.
Change color to black
change color to brown
Eyes
Use the drawing to match size, copy and trace on your Flip. Eyes should not exceed the height of 8 rounds.
First color the base with white. When dried trace the iris and color it in green.
After green color has dried, use black to color the pupils and eye outline.
At the end you can add white sparks.
Sewing mouth
I like this method on adding mouth on my dolls. It is tired out many times by now, dolls have been played with for many hours. Dolls have been machine washed and mouth stayed in place.
I warmly recommend you to try it. It works great on cotton (haven’t tried on acrylic or any other yarn).
Pin where you wish your mouth to be placed. I really didn’t count rounds. Wanted my Flip to have a smile and that was my lead when making it.
As you can see, you’ll need three pins. Outer ones, mouth corners and middle one will determine the depth of your smile.
Try to place outer pins parallel with outer eye edges.
Bottom (middle) pin place centered below, as many rounds as you like or wish your smile to be deep.
Then simply, using darning cotton needle (long one) and black yarn push the needle from one side pin to another. Wrap around the lower, centered pin, and repeat one more time.
Leave ends on both sides.
Cut them short on about 1 cm (½ inch).
Add glue to stitches where yarn it sticking out (cut pieces), add some glue under the mouth line.
Using tooth pick, stick the excess yarn inside the head, and push lightly the mouth yarn onto the head.
Let it dry completely.
On the last photo you can see glue showing, but when it dries out, will be almost invisible.
Mouth will remain firm and nicely stick to the head, and very, very durable!
If your Flip is not sewed by now, sew him up and let’s play!